

How To Make A Toadstool Pincushion
View more presentations from kootoyoo.
 Finally! After so many months of procrastination I managed to finish this tutorial and share it. A few of you were begging to hurry up and post this tutorial already, sorry about the delay ladies.
OK, let's go directly to work. For this pincushion your will need...
 Any size baby food jar (empty and clean of course. I like the tiny ones), glue gun, thread and needle, poly fill (that is how is called, right?) or fluffy pillow stuff, a piece of fabric cut in a 5" diameter circle and some ribbon (enough to cover around the jar lid).
 Make a knot at the end of your thread and needle so it does not come off the fabric. Take needle and tread and sew around your fabric circle over the edge, DO NOT finish off. Use a simple stitch because you will be pulling the thread to close the circle. While you do this your glue gun should be getting hot and ready to use.
 Place the handful of fluffy pillow stuffing in the middle of your fabric and gather by pulling your thread with the needle.
 Use you hand to squish the fabric and stuffing to give it some shape and to continue sewing around.
 Secure with a knot, and finish off. Cut your thread and the top of your pincushion should look like this.
 This is how you will place the pincushion over the jar lid (please ignore that pink thread coming out from under the lid).
 With your glue gun ready, pour enough glue on top of the lid. Be careful because the lid gets hot (I know, my poor glue gun looks disgusting. I will get a new one, I promise)
 Immediately after you put some glue on your lid, place the pincushion on top (stitched part down)and press firmly to glue it to the lid. Keep pressing until the hot glue has cooled down and the pincushion stays on there neatly.
  This is how the jar and lid should look after gluing the pincushion part.
 To conceal the messy part of the pincushion and lid, we are going to glue some ribbon around the lid. Use a wide enough ribbon so it covers part of the lid and part of the pincushion edge too. Work this part little by little to make a neat finish and be careful with the hot glue.
 Glue all the way around the lid, secure and cut the excess ribbon.
habilidad para sacar algo bonito de cualquier minucia.

Vista de los materiales que utilizará MardeMenorca en la confección: telas combinadas, guata, aguja, hilo, cartón y un tapón de plástico de una botella de leche o similar.

Damos comienzo a la tarea realizando el patrón de los pétalos: un círculo del diámetro del tapón.


Para el patrón de la base, añadimos al diámetro del tapón su altura, y 0,5 cm de la costura. Para la tapadera, sólo añadimos 0,5 cm.

Además de los tres patrones, recortaremos en cartón un círculo del mismo diámetro del tapón.

¡Ya tenemos todo preparado para empezar! MardeMenorca ha recortado los nueve círculos para los pétalos, un círculo para la base y otro para la tapa.


Pasamos un hilván alrededor del círculo de la tapadera, colocamos el cartón en el centro y fruncimos. Después quitamos el cartón


Doblamos cada círculo correspondiente a los pétalos dos veces por la mitad.


Colocamos cada uno de los círculos doblados alrededor del círculo base, con la punta hacia abajo y procurando poner los dobleces todos hacia el mismo lado.


Pasamos un hilván alrededor del círculo, cogiendo todos los pétalos doblados. Con el hilván pasado, tiramos del hilo para fruncir el círculo.


Vamos frunciendo y recolocando los pétalos, e introducimos el tapón.


Cosemos una parte de la tapa a la base utilizando la puntada escondida.


Metemos la guata de relleno, y terminamos de coser la tapadera. ¡Listo!

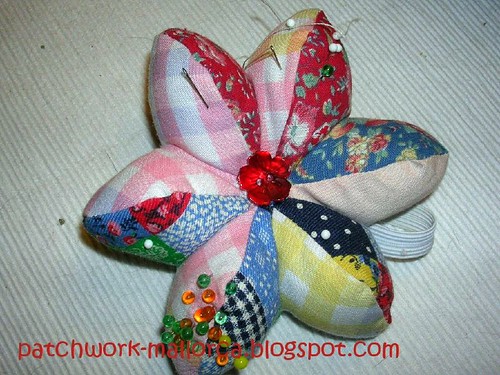
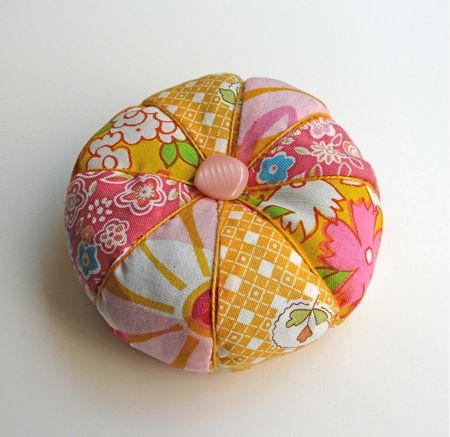
Y aquí nos deleitamos con la maravillosa colección de alfileteros realizados por MardeMenorca. Según ella misma declara, “las combinaciones son infinitas, ahora animaos e intentadlo, es muy fácil”. Sobre todo por su impecable tutorial, ¡enhorabuena!
 El patrón original ya no está disponible en Internet, pero os lo enviaré gustosamente si me mandáis vuestra dirección de correo electrónico. Es un formato PDF en inglés, pero realmente con mirar los diagramas del diseño no hace falta entender las explicaciones, es muy sencillo de hacer. De cualquier manera más abajo os pongo la traducción:
1.- PREPARANDO LAS TELAS:
Cortar 12 trozos de tela para los "pétalos" (de color lavanda en el diagrama) y 6 trozos para la base (azul en el diagrama). Marcar los puntos de referencia sobre el lado del revés de cada trozo.
2.- COSIENDO LAS TELAS:
A mano o a máquina, unir 2 pétalos a lo largo de uno de los lados, cosiendo de un punto de referencia a otro y asegurar con un par de puntadas tanto al comienzo como al final de la costura. Dar un pequeño corte en el margen de costura, sin llegar a cortar el hilo (figura 2a). Hacer 5 pétalos más igual que este.
Coser ahora un pétalo base a lo largo de las dos costuras curvadas de las unidades anteriores (figura 2b).
Para unir dos pétalos entre sí, coser las bases (figura 2c) y entonces coser los pétalos (figura 2d). Repetir esta operación para formar otras 2 unidades como esta.
Unir los 3 juegos de pétalos, dejando una costura en la base sin cerrar (figura 2e), donde pone leave open. Volver ahora el alfiletero del derecho a través de esa abertura.
3.- TERMINANDO EL ALFILETERO:
Rellenar bien apretado el alfiletero con relleno de poliéster. Coser a mano con puntada escondida la costura por donde hemos metido el relleno y coser un botón o cualquier otro adorno en la unión de los pétalos.
http://www.flickr.com/photos/verybigjen/sets/72057594099768007/ Aquí encuentras una idea que te lleva paso a paso en la elaboración de un alfiletero hecho a partir del tapón de una botella. Sencillísimo y me imagino que ultra adictivo.
Estos alfileteros en forma de fresa son preciosos. Los he encontrado en el web de Martha Stewart y por si no lo sabéis, allí se pueden encontrar todo tipo de artesanías, labores, creaciones, la mayoría de ellas reciclando materiales anteriores.En el caso de estos alfileteros sucede éso, se utilizan telas de camisas viejas y cintas bies para realizarlos. Además se necesitará la máquina de coser, aguja e hilo, tijeras, arena fina, cola y fieltro.
Lo primero será realizar unas plantillas, a continuación volcarlas sobre la tela y recortarla. Ésta se deberá plegar en forma de cono y coser a máquina los bordes con puntadas muy juntas. En el perímetro de la abertura superior del cono realizar un punto suelto todo alrededero, para que después se pueda tirar del hilo y fruncir la parte superior de la fresa. Antes de cerrar la fresa, colocarla en un pequeño vaso o recipiente y rellenar con arena muy fina. Tirar del hilo perimetral y proceder a cerrar la fresa.

Leído en: Martha Stewart.

This may be my kitschiest project yet: Empanada pin cushions! After seeing so many fiber artists have their way with cupcake pincushions, I thought I'd throw a little needle love to Mexican puff pastries.
Empanadas are basically fruit turnovers. My Nana Cano used to make them every weekend - cherry, pumpkin, pineapple, lemon, apple and even mincemeat for my dad. Puff pastries are also popular in other countries as well
 , but my design is inspired by the ones I've grown up with here in Phoenix.
I actually made these last Saturday night at The Dirty Devil nightclub where Patrick's band was performing. Under the light of my iPhone, I stitched away. I used white felt, and then painted it to give it a realistic look. It worked. The next day, both my kids picked these up to take a bite and were mad because they were fake! I would call that a success!
NOTE: Yes, you can use a sewing machine on these, but because I knew I would be working in a dimly-lit area (the nightclub), I chose contrasting embroidery thread to hand sew.
Here's how to make them!

Supplies:
1 piece of white craft felt
stuffing, like batting
needle, embroidery thread
brown, yellow and white paint
Scissors
1. Take a piece of white craft felt. Fold it over from the short side, and cut out the shape of the empanada. Keep the fold at the bottom. Now cut the other end of the felt into a strip that is about 3" wide.
2. With the felt still folded in half, stitch the empanada about half away around the curve. Stuff with a lot of batting.
3. Take the strip, fold it lengthwise and stitch it with the embroidery thread along the edge of the curve, gather it here and there to make it ruffled.
4. Tuft the empanada in the center with three stitches. Cut the edge in a curvy design.
5. Add a bit of white and yellow to the brown paint until you get a nice baked look. Use the paint brush to stipple all over the empanada. Let dry.
6. Insert pins!
My pins and needles really take a beating, and I’ve noticed that they’re all dulling a bit. So I thought I’d try to make a pincushion that’s also a sharpener.
This is based on those little strawberry-things that dangle from the tomato pincushions. They’re filled with metal filings, and you poke your pins into them to sharpen.
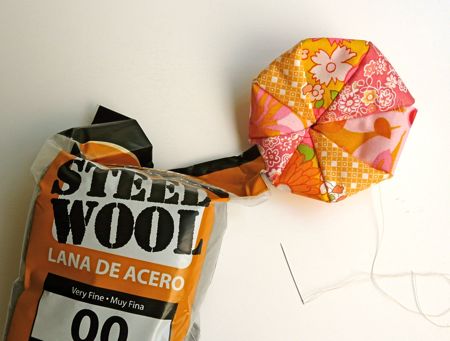
I didn’t have one of these, but I did have some grade 00 steel wool. So I made up a pincushion (the adorable design from Joelle Hoverson’s book) and put this together.
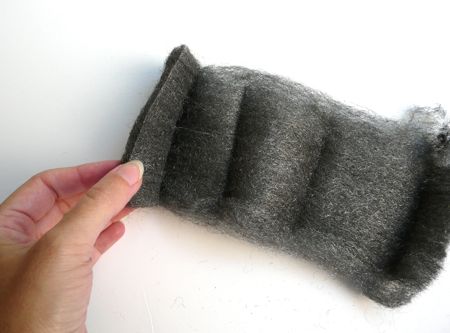
Steel wool comes in pads, so first, I unrolled one…
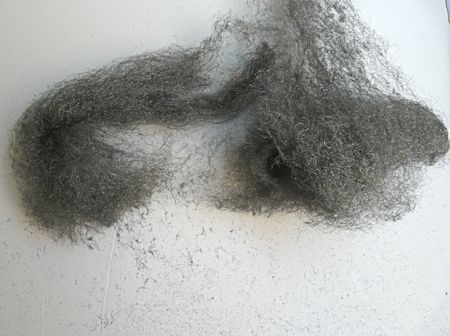
…And tore it up a bit. (Makes a huge mess, as you can see.)
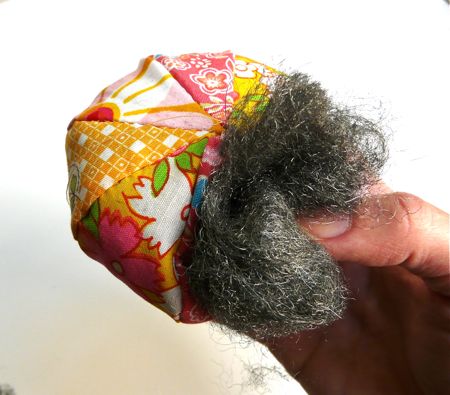
Then I stuffed my pincushion with it. I got two pads in there, and then had to stop. I probably could have used a half-pad more, but:

…I got worried about how much my raw edges were fraying. (Next time, I’d put some Fray-Check on them before stuffing.) Also, I got worried that my fingerprints were wearing off.
Anyway, then I finished off the pincushion. Yeah, it’s a little wonky.
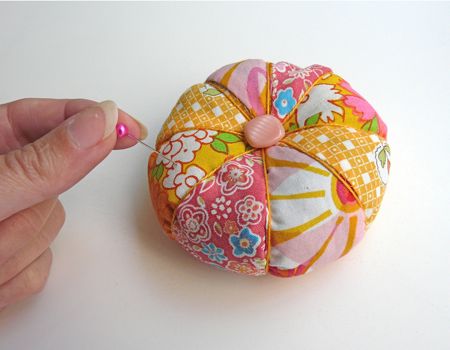
But, I’ve been testing pins and needles, and it works great! Just a few passes in and out, and they’re nice and sharp again. Cool!
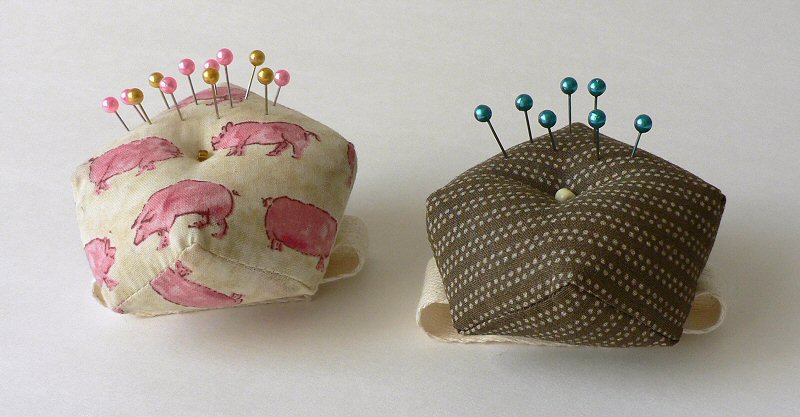
Obviously, this pincushion is way too large for such a project, but I needed an excuse to make it. (You definitely do not want to store your pins or needles in a cushion like this – they can rust.) What would be perfect, though, is those bottle cap pincushions!
Link.


Click for the full size picture
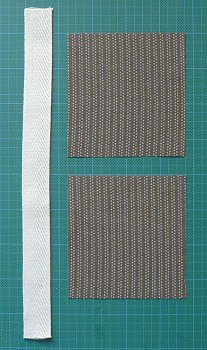
You will need:
2 squares of fabric, each 3.5″3/4″ width twill tape, approx 10-12″ (depending on the size of your wrist)
3/4″ width Velcro, 1.5″
A small bead or button
Sewing thread in colours to match fabric and Velcro
A small quantity of polyester fibrefill stuffing
Instructions
- Measure the circumference of your wrist and add 3.5″. Cut a length of twill tape to this measurement.
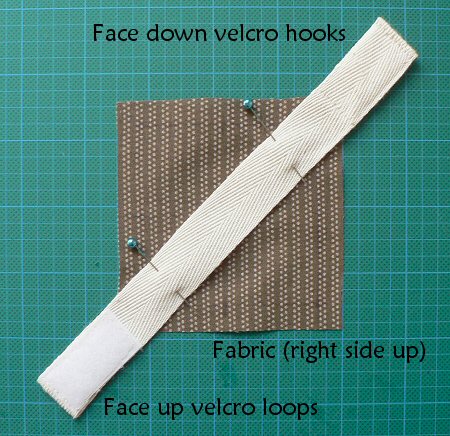
- Lay the twill tape down on a flat surface, and fold up 1 inch at one end of the tape. Position the ‘hook’ piece of the Velcro at the same end so it covers the raw edge of the folded tape. Pin in place if required, then sew all around the edge of the Velcro.

- Turn the twill tape over so the Velcro is face down. Fold up 1 inch at the other end of the tape and position the ‘loop’ piece of the Velcro over this end so it covers the raw edge of the folded tape. Pin in place if required, then sew all around the edge of the Velcro.
- Cut two 3.5″ squares of fabric using scissors or a rotary cutter. Using a fast-fade fabric pen or tailor’s chalk, mark one square (square A) 3/8″ from the edge around all four edges, then mark the centre of each edge. Mark the second square (square B) with registration points 3/8″ down from the top, at each side.

- Position A face up and lay the twill tape along a diagonal of the fabric with the loop side of the Velcro facing up, so that an equal amount of the tape extends over each corner of the fabric. Pin the tape to the fabric.
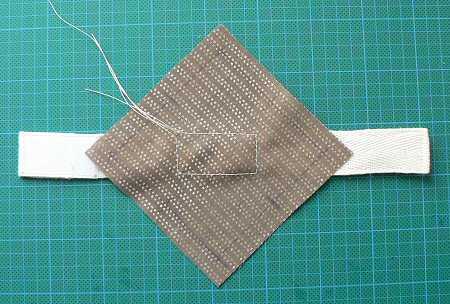
- Sew the tape to the fabric with a 1.5″ long rectangle in the middle of the fabric and tape (turned over in photo below so you can see the stitching).
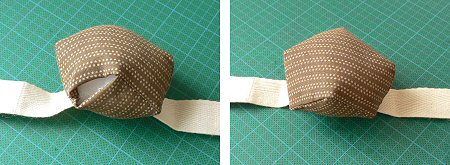
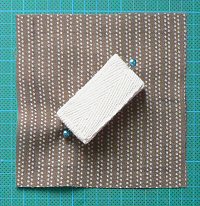 Place B face up with the registration marks at the top edge. Close the wrist strap and pin to itself to keep it out of the way while you sew up the pincushion (see right), then place A face down on top of B. Now offset A by moving it upward until A’s centre marks are aligned with B’s registration marks. Pin the squares together along the right hand side.
Now, to sew the squares together. You will be stitching 7 lines, each half the length of one side of the square, and then rotating either the upper or lower fabric square before stitching the next line. The fabric you have already sewn will get bunched up while you are sewing, but it will all work out in the end!
- Starting at the centre of the right edge of A (point a), sew the squares together from a to b. Make sure the sewing machine needle is down, then lift the presser foot. Rotate A so that the next side of A is aligned with the remainder of the first side of B and point c is directly over point d. Pin in place if desired (as the piece is so small, I find it easier to just hold the two pieces together and feed them through the machine), then lower the presser foot.
- Sew along this edge until you reach point d. Make sure the sewing machine needle is down before raising the presser foot. Rotate B so the next side is aligned with the remainder of the side of A. Pin if desired, lower the presser foot, then sew along the next edge.
- Continue in this way, repeating 8 and 9, until you reach the final side. Leave this side open to turn the pincushion through. Finish off securely.
- Clip the excess fabric from all the corners of the pincushion, then turn it right side out through the open side. It will be a tight fit so be patient with it. You can use a pen or your finger to push out the corners.
- Fill the pincushion with fibrefill until it is fairly solid, then fold the seam allowances inside the cushion and hand-stitch the gap closed.
- Thread a needle with both ends of a length of strong sewing thread, leaving the loop of the thread longer than the two ends. Push the needle through the centre of the pincushion from the middle of the cushion top through to the middle of the tape. Do not pull the thread all the way through – leave the loop extending from the top. Insert the needle close to where it came out and stitch back up through the pincushion and through the loop. Pull tight to dimple the centre of the cushion.
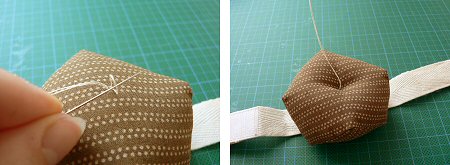
- Add a small button or bead to cover your stitch and then go back through the pincushion, make one more small stitch on the back and come back through to the top. Unthread one of the two ends from your needle, go through the button or bead once more with the other end. Tie the two ends together and then lose them inside the pincushion.
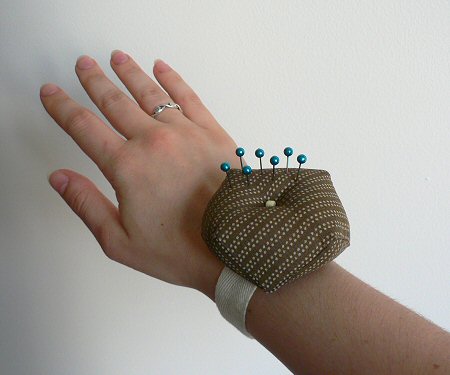
- Attach the pincushion to your wrist, add some pins, and you’re ready to go!
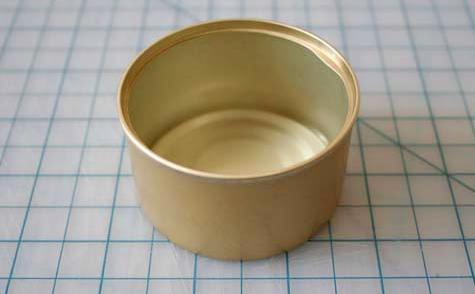
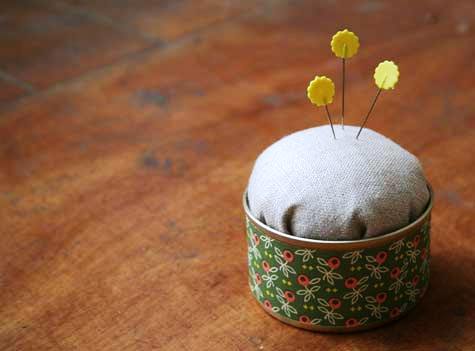
Tin Can Pincushion Here’s what you’ll need:
-1 small tin can
-1 piece of fabric, approx. 8” x 8”
-handful of poly-fil
-small piece of gift wrap or other decorative paper
-double-stick tape
-hot glue
-blade and straight edge for cutting paper
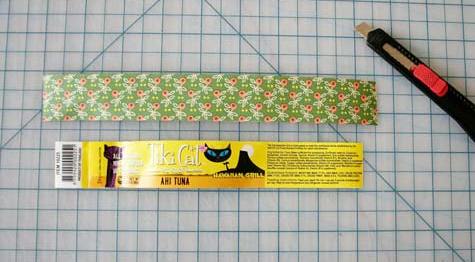
1. carefully remove label from outside of can.
2. trace label onto your piece of decorative paper, adding 1/2″ to the length for overlap.
3. attach to can with one small strip of double-stick tape, and overlap ends with a second piece of tape.
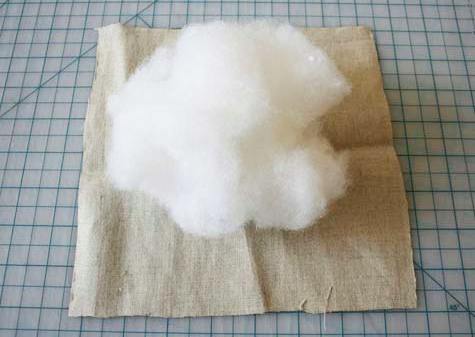
4. place a handful of poly-fil in the center of your fabric square, gathering the ends to create a loose ball shape.
5. line the inside rim of the can with hot glue and insert the fabric/poly-fil ball, with raw edges going into the bottom of the can.
6. tuck in fabric until it is taut. insert pins.

 step 1SUPPLY LIST
Gather the following supplies: -Clean plastic lid from plastic soda or water bottle -4" Diameter template or small bowl (for tracing circle pattern onto the fabric) -Pencil/ pen -Ruler -Needle and about 28" of any color thread (the thread won't be visible when the project is completed) -Fabric scrap -6" of small elastic cord (not beading elastic cord--it's too flim…
 step 2PREPARE THE PLASTIC BOTTLE CAP...."Ring Base"
-Make sure that your lids are clean and dry. -Use a drill and make two small holes in each lid. Depending on the age of the crafters, you may want to have an adult pre-drill all the holes and have the lids ready.
 step 3TIE THE ELASTIC CORD
-Next, lace the 6" piece of elastic cord through the holes. Make sure that the two ends are in 'the opening of the cap. -Now you are ready to "size your ring"...you want it to be snug but, not tight! After adjusting to the correct size, triple knot the two ends and tuck inside the cap.
 step 4PREPARE THE FABRIC CIRCLE...Pin Cushion Top
-Use a 4" diameter template or small bowl and draw a cirlce on your fabric scrap. Next use your scissors to cut out the circle. -Use the ruler as a guide and mark a 1/2" dashed line perimeter around the circle. This seems to help beginning sewers. -Get your needle and thread. Cut a piece of thread that is about 28" long. Thread the needle and pull through the need…
 step 5HAND SEW THE FABRIC CIRCLE
-After sewing around the circle, don't cut your thread! -Gently pull both ends of the thread (the knotted end and the end with the needle). This will cause the circle fabric to gather and form a "cup". Leave the cup open and begin to stuff small handfuls of fiberfill into the cup opening. -It will take more than you think...go slowly and compress the fiberfi…
 step 6CLOSE THE FABRIC CIRCLE
-After stuffing the Personal Pin Cushion fabric circle, pull the threads tight to close the cup opening. -Next wrap the thread around the stem of the cup and knot. Now trim the threads!
 step 7GLUE THE PIN CUSHION INSIDE THE LID/ RING BASE
-Next pre-heat your glue gun. Gather you plastic ring base (that has already been tied with the elastic cord) and your fabric Pin Cushion top. -Have an adult or older child apply a generous amount of hot glue inside the lid and then carefully insert the fabric Pin Cushion "stem" into the base. -Hold securely for about a minute to allow the glue to set. Let th…
 step 8ENJOY YOUR PERSONAL PIN CUSHION RING!
-You just made your very own Personal Pin Cushion Ring! ''''' This easy project puts a smile on everyone's face! It's great for beginner sewing students and groups. ' Great way to use fabric scraps and recycle plastic bottle caps. Turn it up a notch and make a Personal Wrist Pin Cushion using a plastic peanut butter lid!…
 step 1Materials
First you need to get your materials together. * Wool Felt - I used some wool blend sweaters I bought at a yard sale. Washed with hot water and rinsed with cold water and then a high agitation or "Heavy Stain" cycle they form a great felt. *Glue- I purchased Aleene's Tacky Glue *Container- Teacups, soup cups, custard bowls, etc. They are easier to work with if the…
 step 2Cut the Felt.
Cut the felted sweaters into strips the approximate depth of your container. Mine was 2.5 inches deep, and I cut the strips on a slight angle from 2.75 down to just under 2.5 inches.
 step 3Begin rolling it up
Roll the felt like a cinnamon bun, and add pieces as necessary. I used two different colored sweaters so I had color variation.
 step 4Finish rolling
When you get to the approximate size of your container, pull the last row of felt tight and pin to hold together temporarily.
 step 5Glue.
Begin adding glue to the container that is going to hold your pincushion, and then drizzle glue up the sides to ensure it stays.
 step 6Assemble
There was no good way to photograph this step. Take the pin out and hold the rolled felt in your hand. Insert into container and let dry!
 step 7Trim (if necessary)
Trim the layers of felt (if necessary). Once dry (approximately 24 hours)- add Pins!


 step 1Cut Pieces
Cuff (2) strips 9" long x 2.75" wide (1) Iron-on interfacing or other stabilizer (optional) (1) 2" piece of VELCRO Pincushion (2) circles 3-4" in diameter for the outside fabrics (a coffee cup, yogurt container lid or packing tape works great for a circle template) (1) extra layer of scrap fabric for the bottom of the pincushion. This will be on the inside so it does…
 step 2Sew Pincushion
Lay the two circles from your outside fabric RIGHT SIDES TOGETHER. Place the scrap fabric circle on the WRONG side of the piece that will be the bottom of your pincushion. Stitch around edge using the edge of your presser foot as the seam allowance guide. Leave a 1" or so place to turn it right side out. Tip: Sew the opening area closed first by back stitching, th…
 step 3Stuff It
Stuff the pincushion with polyfil. Make sure to stuff between the extra layer of scrap fabric and the fabric that is the top. Slip stitch the opening closed.
 step 4Sew Cuff
Apply iron-on interfacing to the WRONG SIDE of one cuff piece. Lay cuff pieces RIGHT SIDES TOGETHER matching up edges and pin in place. Sew around perimeter of cuff pieces using edge of presser foot as the seam allowance. Leave an opening for turning along one of the longer sides. Tip: See tip in step #3 re: sew opening closed first. Press stitches to shrink them…
 step 5Make Flower
Thread needle with embroidery floss or wool thread. Insert through the middle of the bottom of the pincushion and come out in the top of the center. Wrap thread around outside edge and push needle through the bottom center again coming out on top. Repeat making four quadrants and then divide each quadrant again with thread.

 step 7Attach Pincushion to Cuff
Center pincushion on cuff and hand stitch the bottom side to the cuff. These stitches won't be visible so feel free to not worry about them being perfect. Go around a few times to secure the pincushion to the cuff.
 step 8Attach VELCRO Tabs
Take one side of the VELCRO and sew it to the top side of one end of the cuff Take the second piece of VELCRO and sew it to the BOTTOM side of the other end of the cuff.

No hay comentarios:
Publicar un comentario