
 led before use. Picture 1. After assembly


 fuente
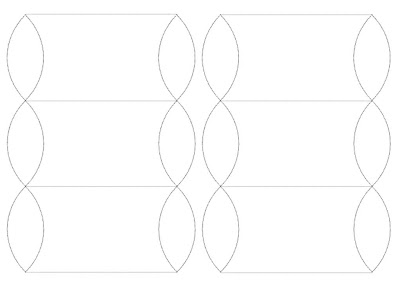

Pillow boxes make great containers for wedding favors and are easy to make. Fill them with chocolates or other treats for guests. You can find cardstock to match almost any wedding style at your local craft store. If you want to make them really stand out, you can decorate the outside of the box with ribbon or other embellishments.
I designed the template so that you can make two boxes from one sheet of 12" x 12" (30.5 cm x 30.5 cm) cardstock. That way you'll get the most out of your paper.

Assemble the following supplies to make this pillow box craft project:
- 1 - 8.5" x 11" sheet of decorative cardstock (or 1 sheet of plain cardstock and 1 sheet of decorative paper)
- glue stick (to glue cardstock and decorative paper together)
- doublesided tape (or regular scotch tape)
- scissors
- blunt object for scoring on dotted lines...I used a mechanical pencil with the lead retracted.
- ruler
- raffia or ribbon
- labels or tags
Craft project instructions:
- Begin by saving this template to your computer.
- To save the template, click the link above, right click on the picture, select "Save Picture As..." and save to your desktop or desired location.
- Print the template onto the backside of your decorative cardstock or plain cardstock, depending on which you are using.
- If you are using the plain cardstock and decorative paper, use the glue stick to bond the two pieces of paper together. Make sure to glue the decorative paper to the blank side of the cardstock.
- Cut the template out along the solid lines.
- Using the ruler and scoring tool, score along all the dotted lines of the template.
- Firmly fold and crease the straight lines.
- Apply a strip of doublesided tape to the decorative side of the tab, fold template and seal shut.
- Gently crease and fold the curved dotted lines.
- Tape one end shut.
- Fill the pillow box, close and decorate with ribbon and tags or labels.
These boxes are perfect for packaging soaps that measure up to 3" x 2.5" x 1.25". Try using them as stocking stuffer or sampler packs and filling them with guest sized bath and body items.
Supplies
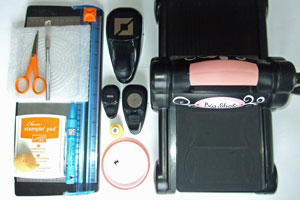
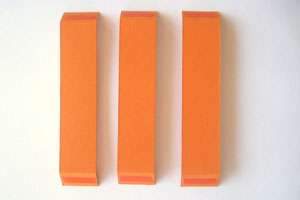
- Three Pillow Box Die Cuts (Pumpkin Pie Cardstock used here)
- Tacky Tape™, or other strong adhesive
- Scissors
- Three 1" x 5" Cardstock Strips for bucket bottom (Pumpkin Pie Cardstock used here)
- One 3/4" x 11" Cardstock Strip for bucket handle (Old Olive Cardstock used here)
- Two 4" cardstock Circle for bucket bottom
- Additional cardstock and punches for embellishment
- Paper Cutter with scoring blade
- Horizontal Slot Punch
- Sponge
- Ink (Pumpkin Pie Classic ink used here)
- Two Brads
Step-by-Step
-
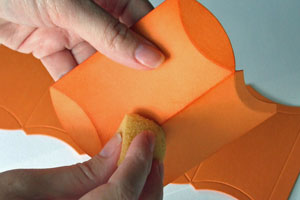
Step 1
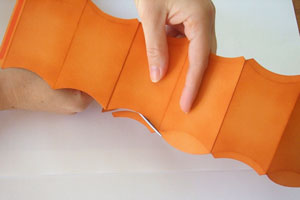
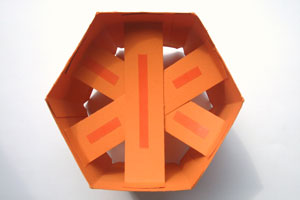
Pre-fold each pillow box die cut on score lines and sponge with ink.
-
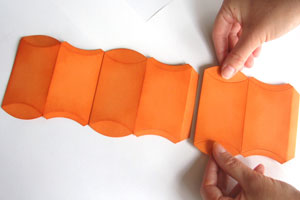
Step 2
Apply Tacky Tape™ to the long horizontal tabs on two of the boxes and tape together as shown in picture, leaving flat.
-
Step 3
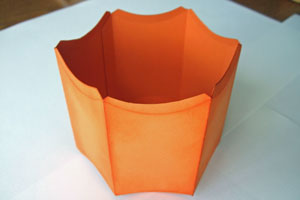
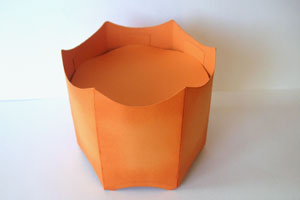
Choose one side to be the top of your bucket and trim the three rounded Pillow box tabs so that all edges are the same.

-
For the bottom edge of your bucket you will need to trim off all tabs (as shown in picture).
-
Step 4
Using Tacky Tape, tape last pillow box to form your bucket.
-
Step 5
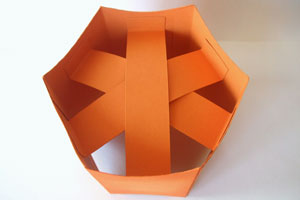
Each 1”x 5” strip of card stock will need to be scored at each end ½”.
-
Apply Tacky Tape™ to the very ends (on one side) and tape them to the inside bottom of the bucket ¾” from the bottom with the ½”scored strip facing the bottom of the bucket.
-
Step 6
Apply tape to the bottom of the criss crossed strips
-
and tape 4” circle in place.
-
Step 7
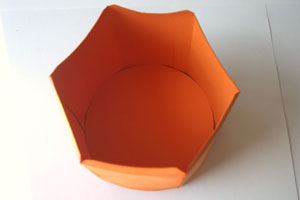
Flip bucket over and place the second 4” Coluzzle circle inside the bottom of the bucket.
-
Step 8
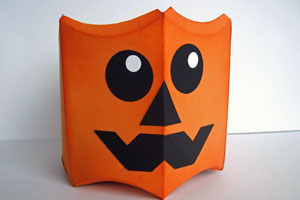
Decorate Bucket front if wanted.
Used here:
Two 1" black circles for eyes, 3 1/4" white circles for eyes, 3 black photo corner punch-outs for mouth, one hand-cut triangle for nose.
-
Step 9
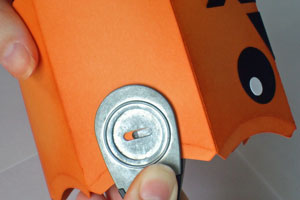
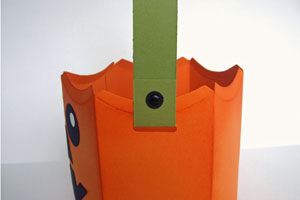
Make elongated punches on each side of the bucket using the Horizontal Slot punch
-
and feed the handle through, fold and attach with tape or brads.
:
You'll need a the Big Shot for this project; some card stock, designer paper, punches, and accessories.
I started of by using the Big Shot, the Top Note Die ad the Pillow Box die. Using Kiwi Kiss textured card stock, I cut out a pillow box and a top note; using the Raspberry Tart Designer paper I cute out a top note.
I then cut the top notes in half (make sure you cut on the smaller end because the longer side will be too long. I then cut the outer edge of the designer paper and layered it on top of the Kiwi Kiss to end up with something that looks like this.
I then added sticky strip/double sided tape to the bottom edge of the assembled Top Note, to the flap on the box, and to the bottom edge of the pillow box. Make sure you're working on the side that will go on the inside, so for my example is the non - textured piece. Once you attach the top note it will look like this.
You can use your punch on the bottom half if you want a peek window, if not, fold the bottom edge to the top and you'll end up with something that looks like this.
I used the Small Oval punch to make the opening on the top note so it looks more like a purse. You're now ready to decorate as you wish, fill your pillow box purse with goodies and you have it ready to be gifted!
Again, here's the final pillow box purse.
A very quick and easy little gift project: Pillow box gift card holder. This would be perfect to give as a birthday gift or to that special teacher as a thank you gift. : ) It’s just the right size to slip a gift card into.

You will need:
- 1 sheet patterened paper, cardstock weight
- bone folder
- adhesive
- pillowbox template. (there are lots of them online - do a google search under images) the one I used can be found here

1. Cut out your pillowbox template and trace it onto your patterned paper

2. Cut the pillowbox shape out of the patterned paper.

3. Lay the template ontop of the patterned paper cut out and trace the lines with a bone folder. Press hard.

4. Fold along all the lines, press with bone folder if needed

5. Carfeully fold in the side flaps, this can be a little tricky

6. Glue the small flap to the inside of the box

7. Fold sides in on both sides and your box is complete!

Add some ribbon, embellishments and a tag and it’s ready to give as a gift.
Supplies needed:
Cardstock:
8-1/2” x 11” 1 Sheet
4” x 4-1/2” 1 piece
Designer Series Paper:
4-1/4” x 4-1/4” 2 pieces
4-1/4 x 1-3/4” 1 piece
Sticky Strip
Bone Folder
Scor Pal or Ruler with scoring blade
Dimensionals
Velcro closure
Misc. decorations

Step #1
Using your 8-1/2” x 11” piece of cardstock, place the 11” side at the top and score at 4-1/2” and 6-1/2”. Turn your cardstock where the 8-1/2” side is at the top and score at 2” and 6-1/2”.

Step #1A
Crease all of your score lines with a bone folder.

Step #2
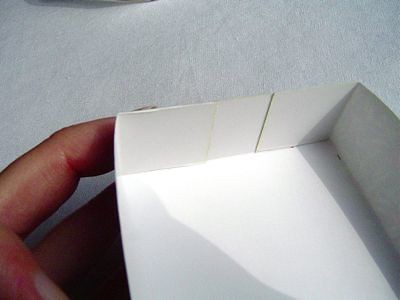
With the 11” side against the top of your scorer, score at 2-1/2” stopping at your 2” score line. Score at 8-1/2 stopping at the 2” score line.

Step #3
You will now score a diagonal line in that 2” square which you will turn into mountain folds.

This is the way your cardstock should look at this point.

Step #4
Adhere your designer paper (4-1/4” x 4-1/4”) to the front and back of your box.
 Step #5
You will place your sticky strip on the outside edge of the 2-1/2” area. Remove the protective strip and adhere to the 4-1/2” area. (you are just folding the crease down to the middle area. Do this on all four corners.

This is the way the cardstock should look now.
Cardstock:
8-1/2” x 11” 1 Sheet
4” x 4-1/2” 1 piece
Designer Series Paper:
4-1/4” x 4-1/4” 2 pieces
4-1/4 x 1-3/4” 1 piece
Sticky Strip
Bone Folder
Scor Pal or Ruler with scoring blade
Dimensionals
Velcro closure
Misc. decorations

Step #1
Using your 8-1/2” x 11” piece of cardstock, place the 11” side at the top and score at 4-1/2” and 6-1/2”. Turn your cardstock where the 8-1/2” side is at the top and score at 2” and 6-1/2”.

Step #1A
Crease all of your score lines with a bone folder.

Step #2
With the 11” side against the top of your scorer, score at 2-1/2” stopping at your 2” score line. Score at 8-1/2 stopping at the 2” score line.

Step #3
You will now score a diagonal line in that 2” square which you will turn into mountain folds.

This is the way your cardstock should look at this point.

Step #4
Adhere your designer paper (4-1/4” x 4-1/4”) to the front and back of your box.
 Step #5
You will place your sticky strip on the outside edge of the 2-1/2” area. Remove the protective strip and adhere to the 4-1/2” area. (you are just folding the crease down to the middle area. Do this on all four corners.

This is the way the cardstock should look now.
 This is how it looks with all four corners adhered.
Step #6
Place adhesive on your triangle pieces and adhere your front and back to the box area.
You should see your box taking shape.
You should see your box taking shape.

Step #7
Take your 4 x 4-1/2” piece of cardstock and place the 4” at the top of your Scor Pal and score at 2”. Crease your score with your bone folder.

Step #8
Place adhesive on the top and bottom of the back side of the cardstock (do not put any adhesive on the front part of your top) and adhere to the back of your box.

Step #9
Once your back in adhered you can now put your 1-3/4" x 4-1/4" piece of Designer paper on the front part.
Step #10
Decide what stamp set to use for the front of your closure and cut your cardstock accordingly. Remember to only place adhesive at the top of your closure piece. On the backside bottom attach your Velcro to hold your box closed.

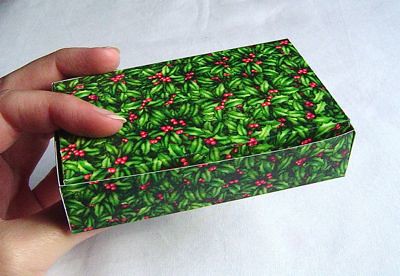
Finished Box


Finished Box

Side View
I hope you have enjoyed this tutorial. Please, when you have made a box either link to this tutorial so I can show off your boxes. It is always fun to see what others have done. Thanks, Paula
I was teaching a card-making class over the weekend, and the nicest woman ever said to me, “Have you tried making boxes from your old cards?”
Well, I hadn’t, so she showed me the coolest method for converting an old greeting card into a spanking little gift box. And not only that, at the next day’s class, she brought me a pile of blank greeting cards, so I could show this to the next Church of Craft meeting. Unbelievably kind! Thank you so much, Deanna.
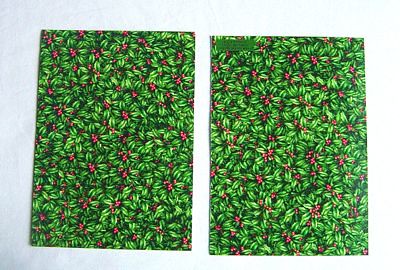
So, this technique is so exciting, I had to share. You may not be ready to look at Christmas stuff yet, so just imagine a Halloween card in its place if you need to.
Start with a greeting card. If there’s writing on the inside, you can glue-stick some paper over it to cover it up.
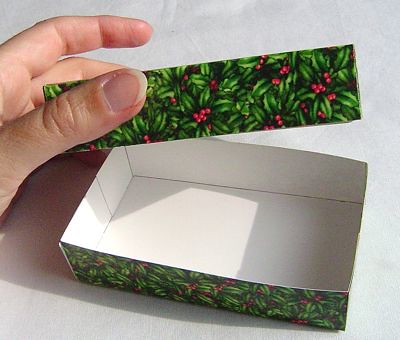
Cut the card in half along the fold.
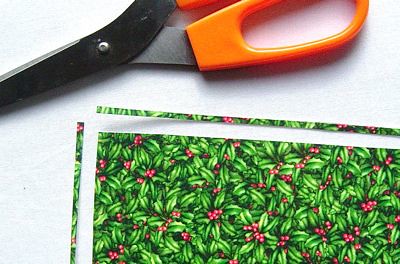
Take one half of the card. Trim about 1/8″ off of one long side, and one short side. (If you have a paper cutter, of course, use that.) You do this so that the bottom of your box will be slightly smaller than the top, and they’ll fit nicely together.
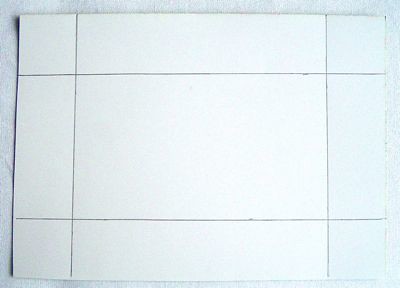
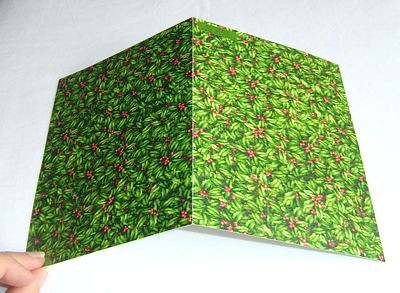
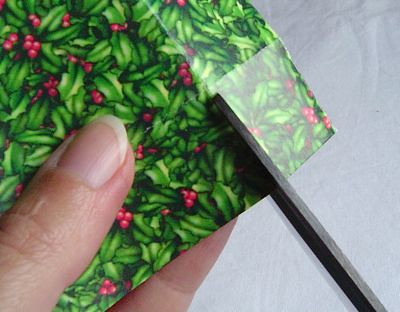
Now, make a score 1″ from the edge on all four sides. (If you have a paper cutter with a scoring blade this is easy. If not, you can use a ruler and a bone-folder, or even a ruler and an empty ball-point pen to make the scoring.)
I’ve marked my score lines in heavy pencil here, so they’re visible in this tutorial. You probably won’t want to make any marks on your card.
Fold the card along all four score-lines. Then, score and fold the other half of the card in the same way.
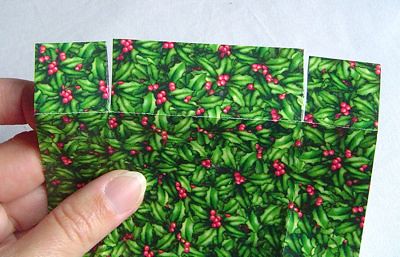
Now, at the shorter ends of each piece of card, you’re going to make two small cuts, where the two folds intersect. The second photo explains this better than I’m doing.
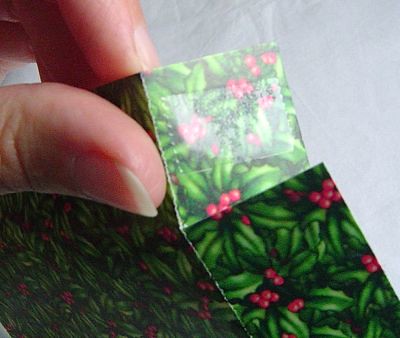
Put a little tab of double-stick tape on each of the resulting flaps.
Now, fold up the long sides of your box, and fold these tabs in as shown.
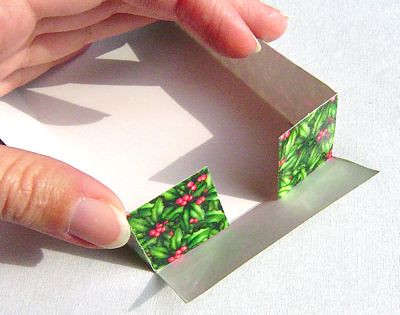
. . . And fold up that end flap and press the tape to stick it in place.
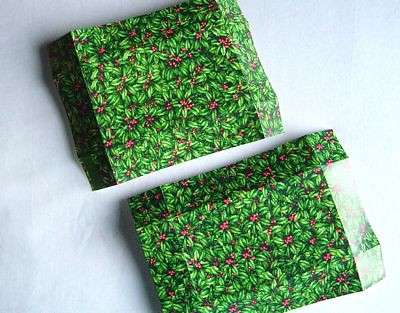
Make the other half of the box in the same way, and presto!
I can see these for little gifties, but also for cool holiday-dinner favors/placecards. And keep in mind that you can vary the size and depth of these by simply changing the location of your scores. You can score 2″ from each edge, for example, and get a much smaller, deeper box – suitable for a gift of homemade truffles.
http://www.instructables.com/id/Gift_Box_from_a_Cereal_Box/
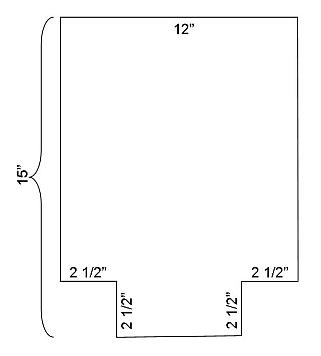
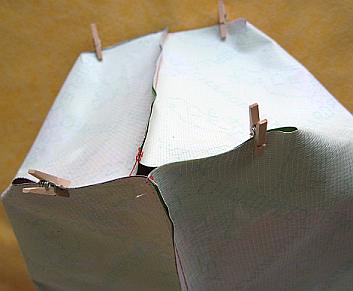
I first made a pattern out of cardboard measuring 15 x 12. Cut a 2 1/2 inch square out of each bottom corner.
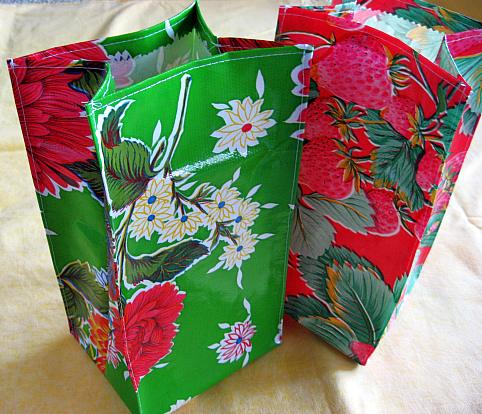
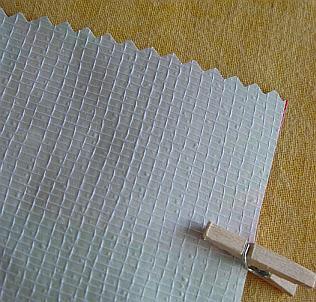
Take two pieces of oilcloth right sides together and draw around your template. Cut out. I used small clothes pins to hold the pieces together.
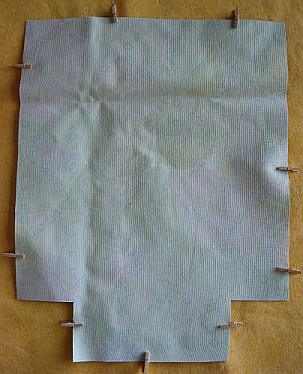
I used pinking shears to cut across the top (very optional- I thought it gave the edge a finished look)
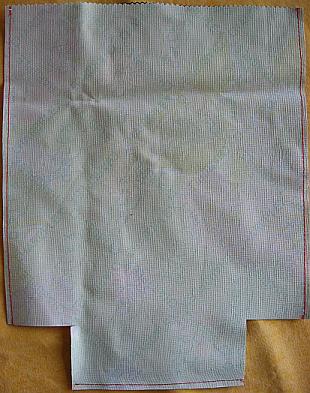
Sew down each side and across the bottom. I used a stitch length of 5 and 1/4 inch seams on the entire bag. My machine handled the oilcloth beautifully, but If you have any troubles, Sew Mama Sew has a wonderful article on sewing with oilcloth.
Fold in bottom of bag bringing bottom seam and side seam together
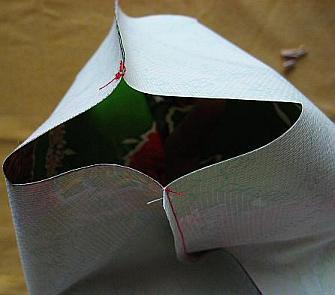
Pin bag bottom to bag side with clips
Sew across on each side
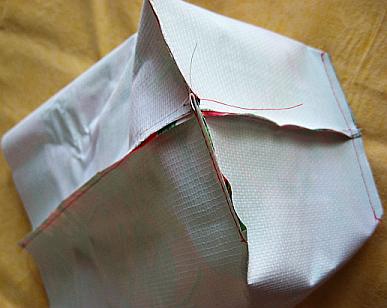
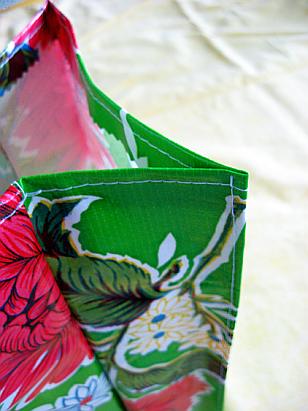
Turn bag right side out and fold in top of bag about 1/2" and then top stitch

Measure about 2 1/2 inches from middle side seam on all four corners, finger press, clip with clothes pins
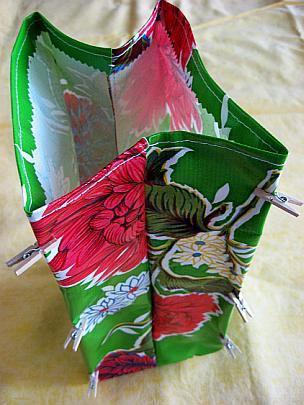
Top-stitch closely to the corner fold on each of the four sides
I have had this tutorial on my mind for
so long! I love little houses and creating
wee villages, definitely a carry over from
my childhood, and have been wanting to
make some of my own to play decorate
with. I figured I could make houses from
all the cardboard boxes in my recycling so
now I have finally taken pictures and
written up a tutorial to share with you!
There are a lot of pictures but the
tutorial is actually very simple. Once the
house is made it can be painted or covered
with paper or even left plain. You can also
leave one flap open and use it as a gift
box, part of an advent, or just a hiding
place for treasures :)
cardboard box from the pantry
straight edge
pencil
scissors
thick white glue
something to score with
Optional:
clamp, clothespins, or painter's
tape for holding pieces until
they dry
*click on pictures to enlarge*
in the picture
#9: here's the box all glued up
in reverse and the top is cut
and ready to make the roof
on the score line you made earlier
in #4 then fold back up straight
#11: apply glue to the small flap
at the top of the short side panel
(see arrow in picture #10); put
glue on the unprinted side and
glue together as above
mark and score angled roof edges
against the front and back panels of
the box (all four angles)
front and back panel at the peak
of the roof
angled roof line about 3/8" away
from your marked and scored
line (do this for all four angles)
peak of the sides (four times)
just cut towards the box; apply
glue on all the flaps and tuck
into the roof
glued and ready to be decorated!
the small house in the middle
is made from two pudding
boxes glued together and the
square house on the right is from
a tea box. You can also change
the height of the roof by adjusting
the length of the four vertical cuts
you made in #3.
of being glued and then I covered
them with paper.
acrylic paint. They can be drawn on
after they have dried. The little
house with the green roof is made
from an allergy medicine box.
I hope you'll try to make some
houses. They are easy enough for
older kids to do and younger kids
can have someone else make the
house and then enjoy the painting
and decorating. Have fun with it!
fuente
http://belladia.typepad.com/bella_dia/

 fuente
I’ve been doing some experimenting building baskets and boxes out of fabric. I have a lot of grommets and a few grommet tools. I had an idea for a box/basket and a color combination, brown and blue.

I sandwiched 5, 7″x7″, pieces of stiff felt between a brown and a medium blue polka dot on light blue fabric. The pieces are sewed together like a pillow. Sew with wrong sides together then turn. I was making it up as I went along. I discovered that it was best to sew around the bottom piece of felt.

My first attempt at grommets failed. I found this new kind of grommet at the craft store. It has prongs that can be flattened down. With a little fray check around the holes, these grommets worked great on my fabric basket.

I folded and tied the ends together with ribbons. VIOLA! I have a box/basket.
I made some boo-boos with this one, so I’ll be keeping it. Now that I figured out how to put the baskets together, I think I’ll be making a few more. I have an idea for some gift baskets.
fuente
http://perpetualplum.wordpress.com/2008/02/16/building-a-basket-using-vintage-fabrics-and-grommets/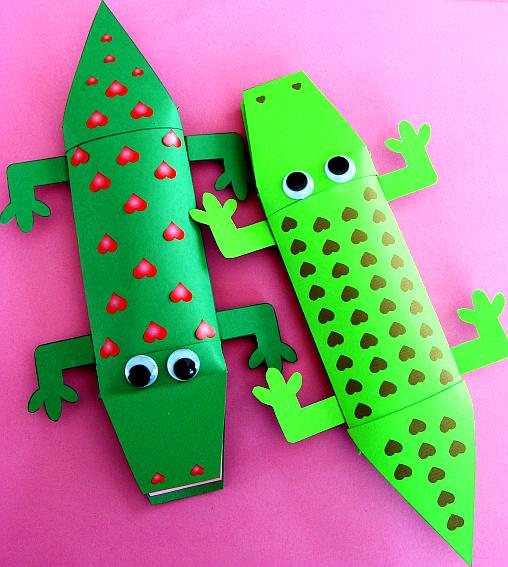
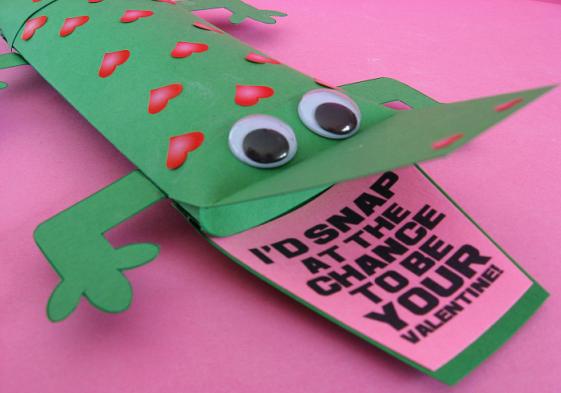
- Pillow Box Alligator- blank so you can add your own embellishments like stickers, heart hole punches, glitter and more!
- Pillow Box Alligator with pink hearts
- Inside of mouth

Cut out pieces

Lightly score lines on pillow box and gently fold

Put glue on side flap of pillow box and fold together, leaving the ends open. Allow to dry a few minutes before folding in the ends of the box.

Score about 1/2 inch from the end of the upper mouth piece so it can open and close (see final picture). Fold in ends on box and begin gluing on upper and lower mouth and the tail.Use lots of glue stick! Use a rubber band to secure pieces while they are drying.

Fold edge of each leg and glue to sides of box

Add some googly eyes and fill box with candy
No hay comentarios:
Publicar un comentario