
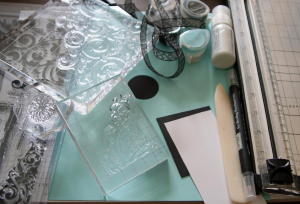
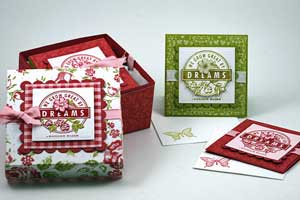
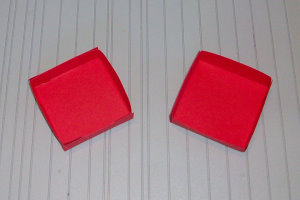
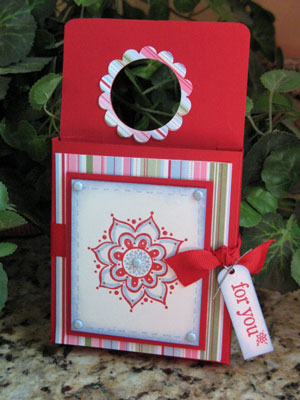
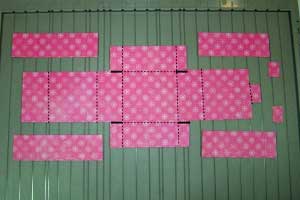
TO CREATE THE BOXES:
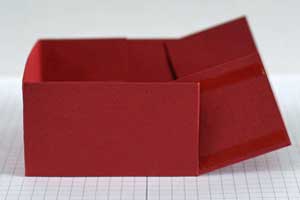
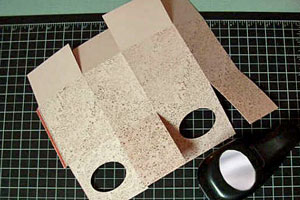
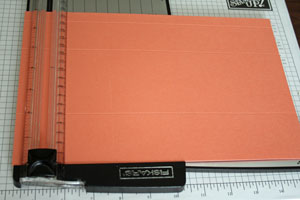
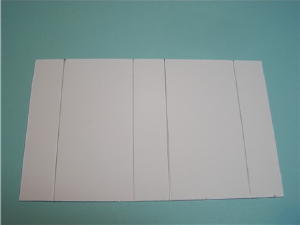
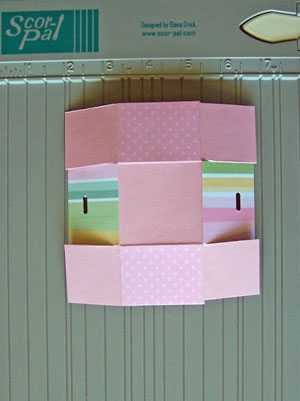
To make them you need a 5 x 5 piece of cardstock, scored at 1.5 inches from the edges, and then folded and adhered. To create theses 6 boxes took about 15 minutes! Very quick! Here is a little tutorial with pictures how to make the boxes:

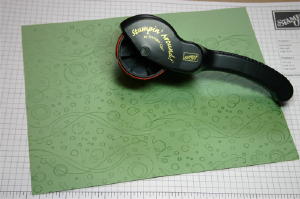
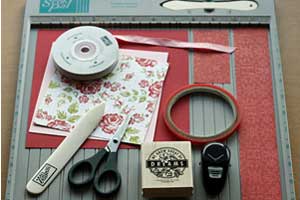
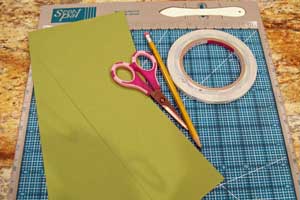
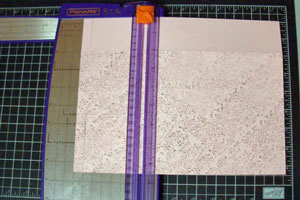
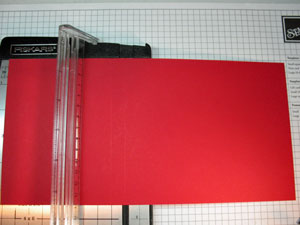
1. I used my The Tiny Dancer Collection paper that comes with the Easter Key Ingredients kit from Taylored Expressions to create my drawers
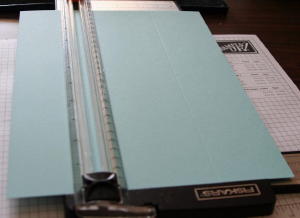
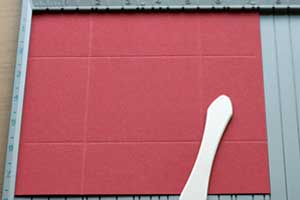
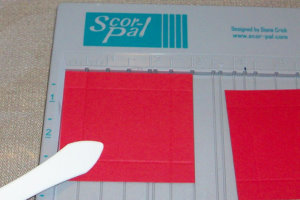
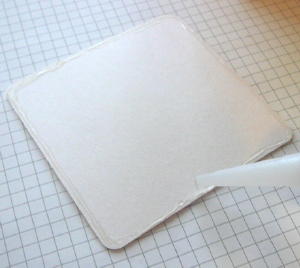
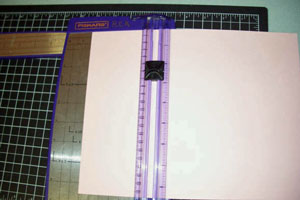
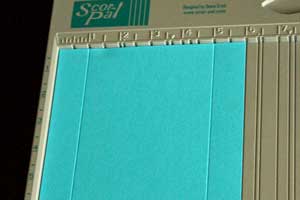
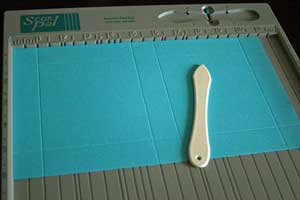
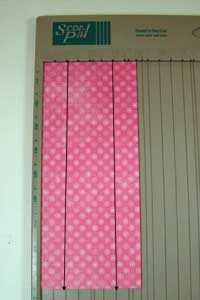
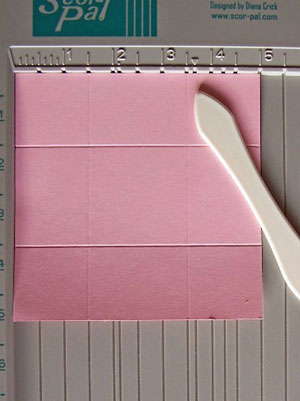
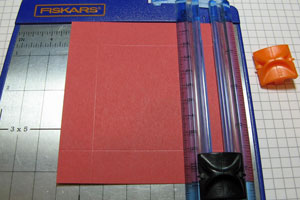
2. Cut cardstock to 5 x 5 inces
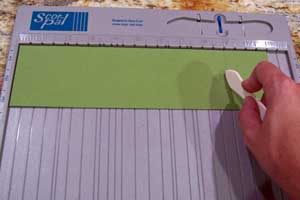
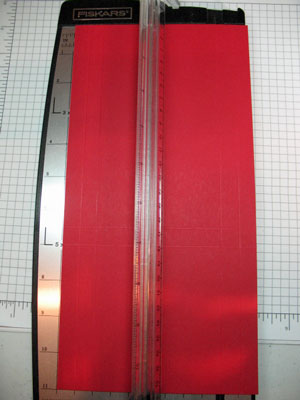
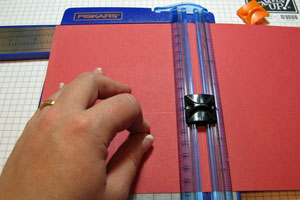
3. Score cardstock at 1.5 inches from the edges
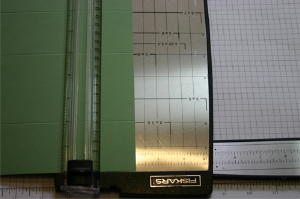
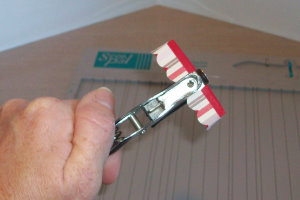
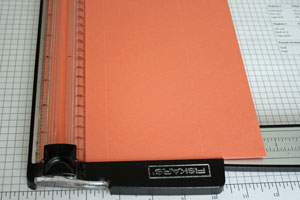
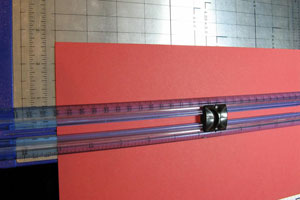
4. If you don't have a Scor Pal - you can use a Paper cutter - just place where it needs to be scored and use your scorer along the path of the blade.
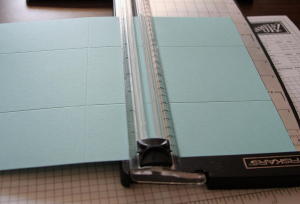
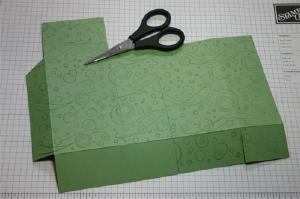
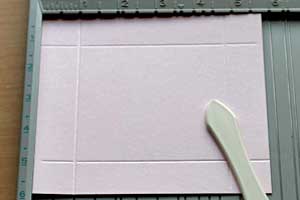
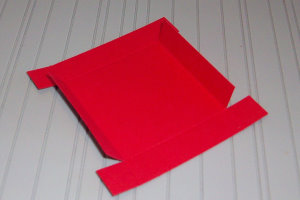
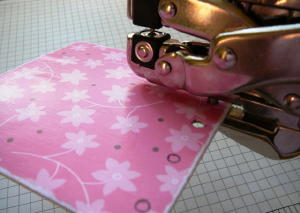
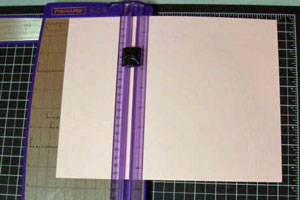
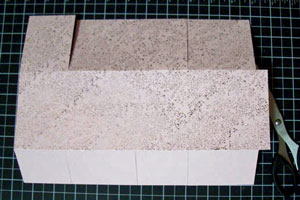
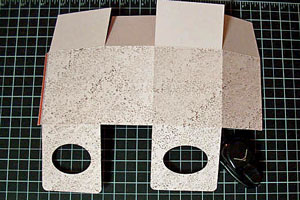
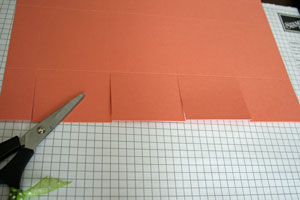
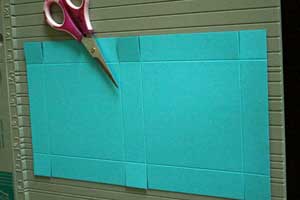
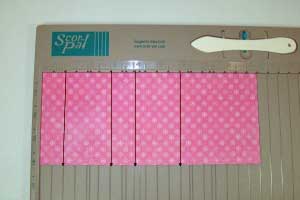
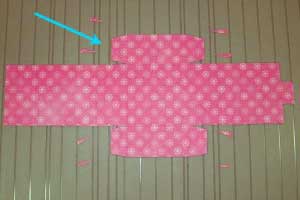
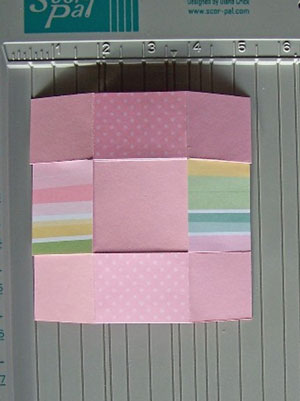
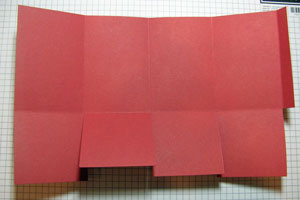
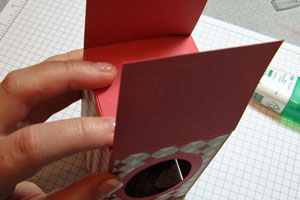
5. Cut the paper along the vertical fold only until the middle
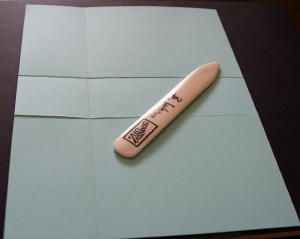
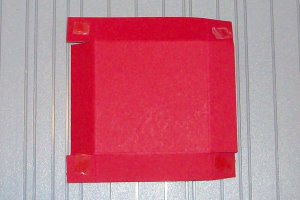
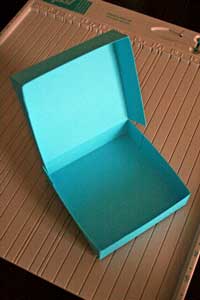
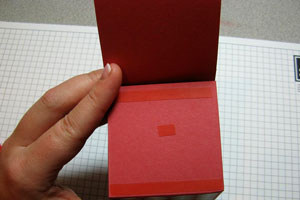
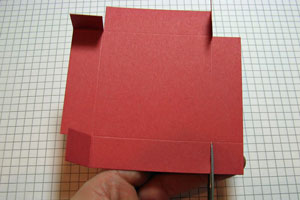
6. Fold and adhere
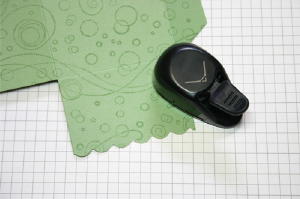
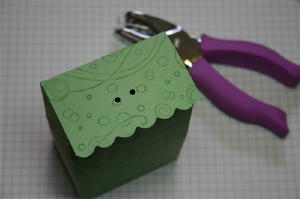
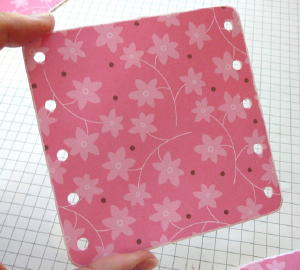
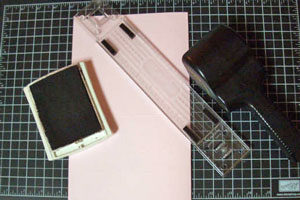
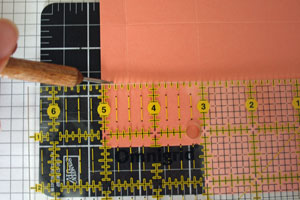
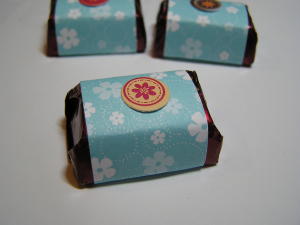
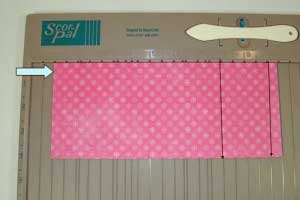
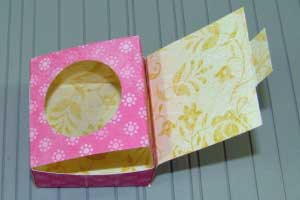
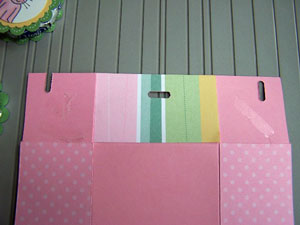
7. Use a mini circle punch (1 "punch) to create a half circle to create room to pull the drawers out
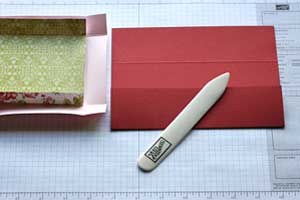
8. Your 2 x 2 inch card is ready to be decorated and filled!!!
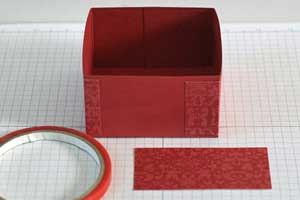
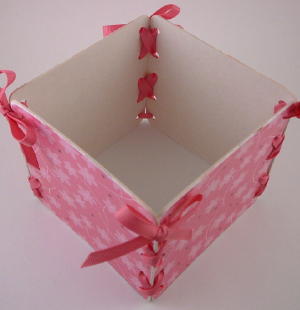
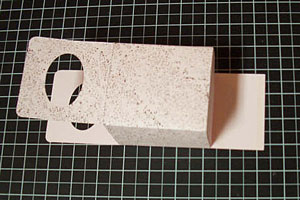
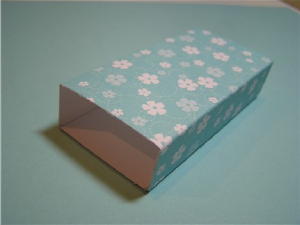
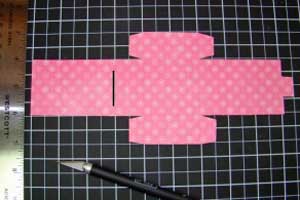
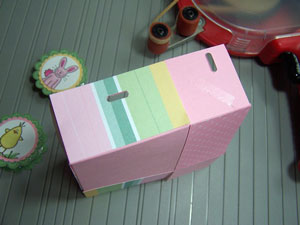
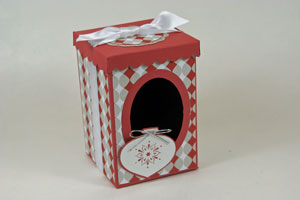
TO CREATE THE HOLDER FOR THE BOX:
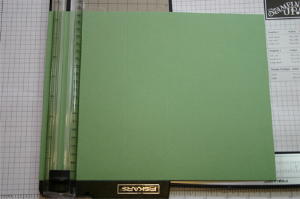
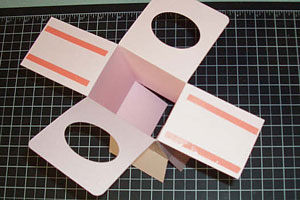
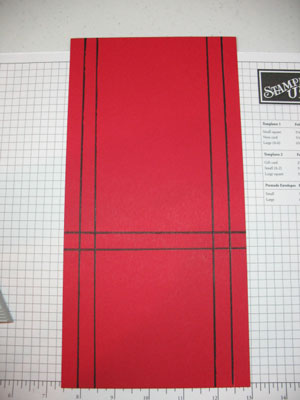
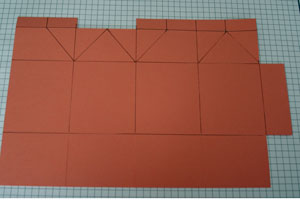
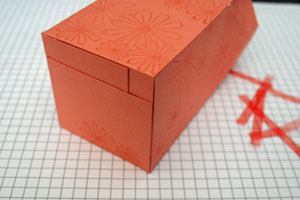
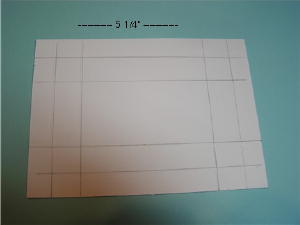
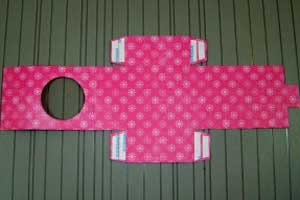
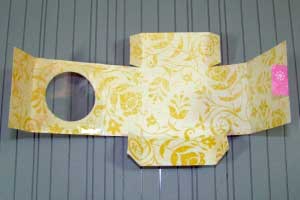
After you make the boxes - you can create a little shelf to hold them in - I created a box that was to hold the drawers in. All you need for this is a piece of cardstock that is 8 3/16 by 5 1/2 inches to hold two of these drawers. The cardstock is then scored at 2 inches, folded and adhered. Here is a little tutorial on how to make these drawer holders:

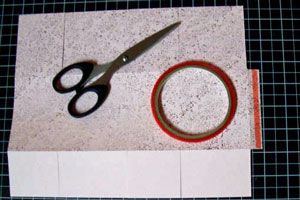
1. I used the beautiful and heavy cardstock from Taylored Expressions (comes with the Easter Key Ingredients kit) and measures 8 1/2 x 11 inches
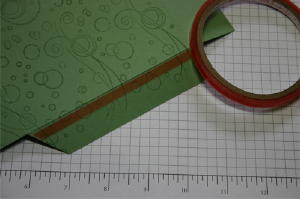
2. I cut the cardstock to 8 3/16th by 5 1/2 inches and then scored at 2 inches from the edges.
3. No Score Pal? No problem - you can use your paper cutter as a scorer - just run the scorer through the tracks of where the blade would run
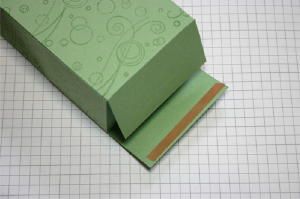
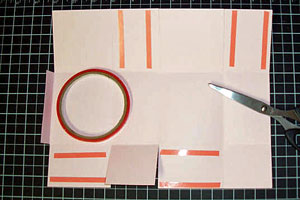
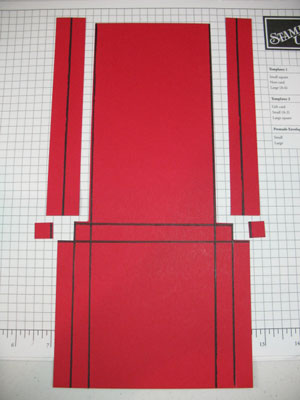
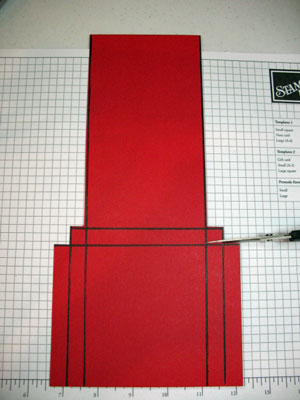
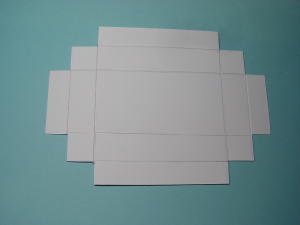
4. Cut vertically up the folds towards the middle (2 cuts going up on the bottom and 2 cuts coming down from the top)
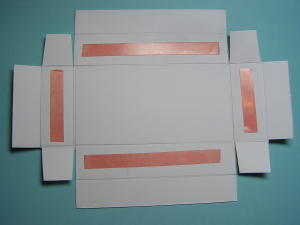
5. Fold and adhere.
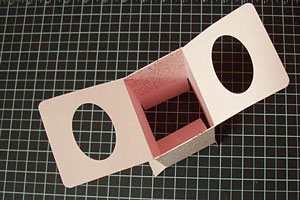
6. Your rectangular box (4 3/16 x 2 inches) is now ready to hold two little drawers!!
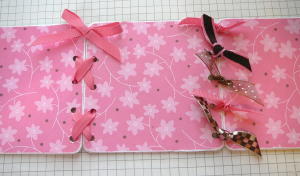
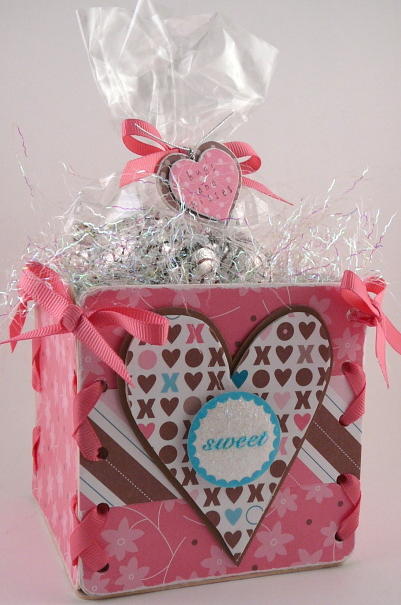
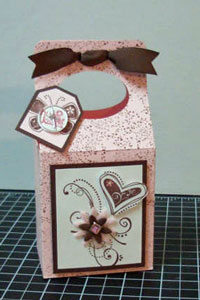
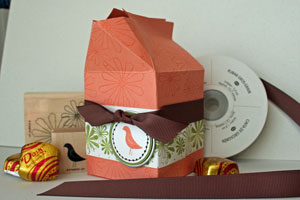
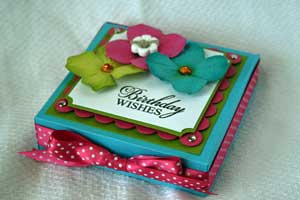
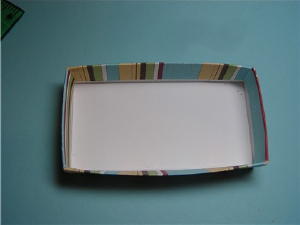
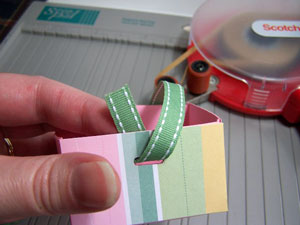
Then all you have to do is to adhere and create levels to your mini chest by stacking them up. I created three levels. And then decorate as you like.
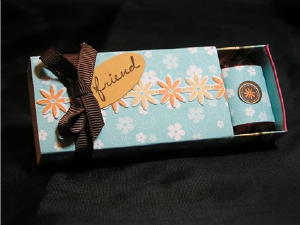
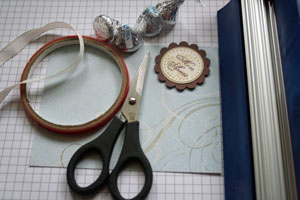
This project was really simple - because all the papers in the Key Ingredients kit coordinates and it comes with built in accessories such as the felt flowers, brads and matching ribbon. Everything is already ready at your fingertips!
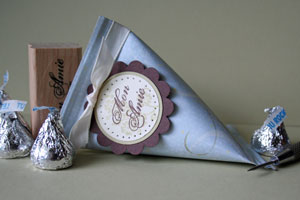
Since this is a gift for one of my dear friends - I used this beautiful sentiment: We are friends forever in sunshine and shade! Isn't that sentiment just the sweetest! It was fun to stamp the tree from the Branching Out set on either side and decorating them with the emerald liquid pearls for leaves and brads for flowers (an idea that was inspired by Donna Baker). I stamped and cut out the tree branch from this set and also two little cutie owls from the Branching Out coordinate set and then tired a little bow from this sheer ribbon. On the front of each of the drawers, I attached these super cute felt flowers with these cute glittery brads - all of which come together as part of the Key Ingredients kit.

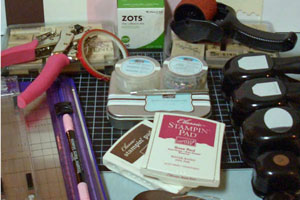
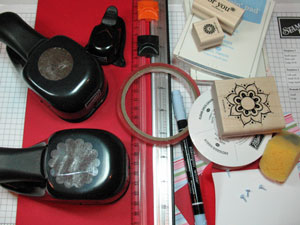
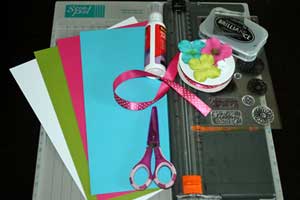
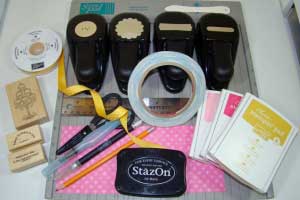
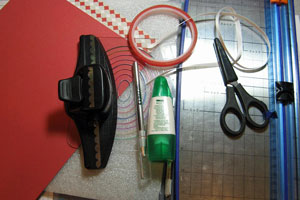
Supplies:
Ink: SU! Rose Red
Accessories: Scorer, Paper Cutter, ruler, (Ribbon, felt flowers, brads - all come with the Easter Key Ingredients kit), adhesives, 1"circle punch (Martha Stewart), Liquid Pearls
FUENTE
stampasweetimpression.blogspot.com/http://cambriaturnbow.blogspot.com/2007/09/batty-for-you-basket.html
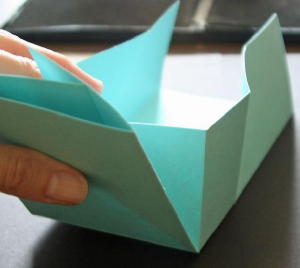
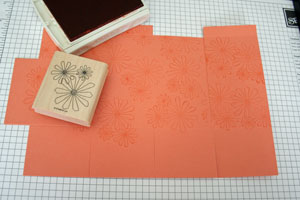
Turn a 8 1/2" x 11" piece of cardstock into a box with just a few scores.
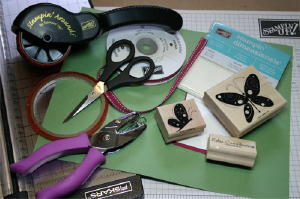
Supplies
- Paper cutter with scoring tool
- Bone folder
- Cardstock - one sheet of 8 1/2" x 11
- Additional cardstock for main image
- Stamps (Bella Brush set, Fancy Pants Designs)
- Ink (Snow Cap, Adriondack Acrylic Paint Dabber; Black and Sea Breeze VersaMagic Dew Drops)
- Ribbon
- Double circle or double rectangle punch
Step-by-Step
-
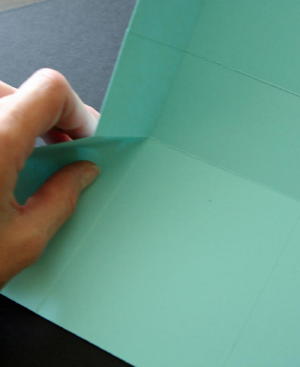
Step 1
Score sheet of cardstock on the short side at 2 1/2" and 6".
-
Step 2
Turn sheet of cardstock and score the long side at 4 1/2" and 6 1/2".
-
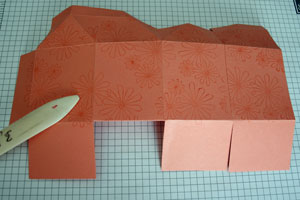
Step 3
Prefold along score lines several times both ways, or step four will be difficult.
-
Step 4
Bring horizontal fold to vertical fold to create a diagonal crease.
-
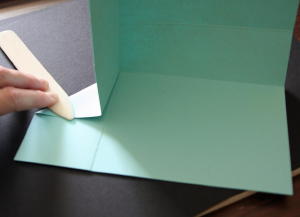
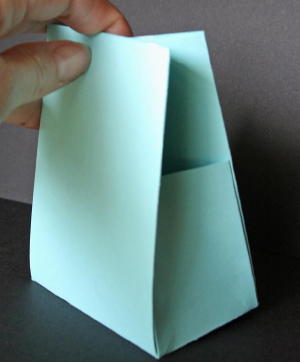
Step 5
Use a bone folder to really make the diagonal folds "sharp" and easier to fold the sheet into a box.
-
Step 6
Repeat steps four and five on the three remaining corners.
-
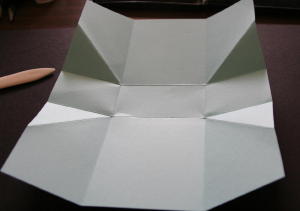
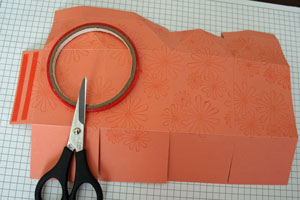
Step 7
Stamp your cardstock. Here, only the front, back and short middle sides were stamped. The other parts of the cardstock will be folded in not seen.
-
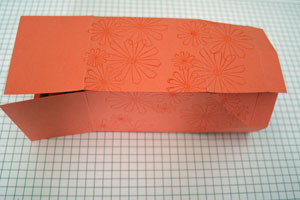
Step 8
Prefold the box by bringing the diagonal folds towards the box center.
-
-
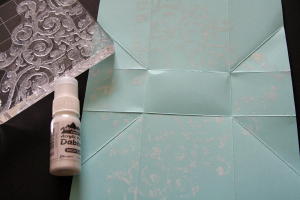
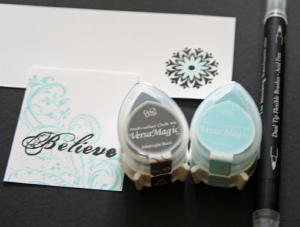
Step 9
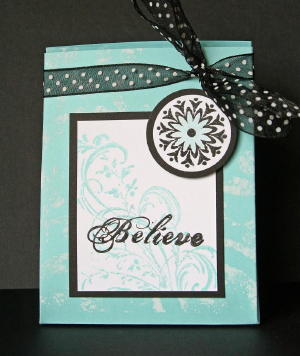
Stamp center image and accent.
-
Step 10
Adhere center image and accent to box front.
-
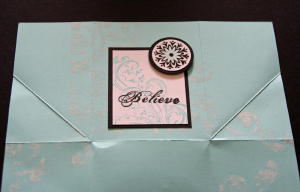
Step 11
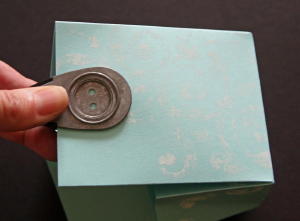
Use the double circle punch (or another hole punch) to add ribbon holes in the top center of the back panel of the box.
-
Step 12
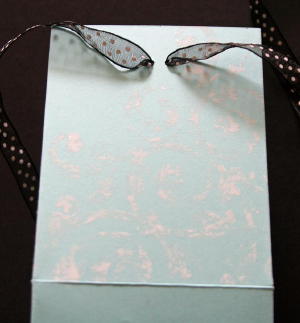
Thread ribbon through both holes.
-
Step 13
Tie the ribbon in front and the box is complete.
Your Turn
You've seen the tutorial, now you try it! We've got a section of the gallery set aside for One Sheet Box. Try this technique, then upload your artwork to the gallery. Show us your creations!Create party favors with just one sheet of cardstock, some scored lines, and some adhesive.
Supplies
- 8 1/2" x 11" Sheet Colored Cardstock
- Cardstock scraps for front of box
- Corner Rounder Punch or decorative scissors
- 1/8" handheld circle punch
- Paper trimmer with scoring blade
- Scissors
- Sticky Strip™
- Stampin' Dimensionals
- Stamps, Ink, Ribbon
Step-by-Step
-
Step 1
Position cardstock lengthwise. Using scoring blade on paper trimmer, score cardstock at 2", 5", 7", and 10".
-
Step 2
Turn cardstock, and score at 2" and 7".
-
Step 3
Stamp scored cardstock as desired.
-
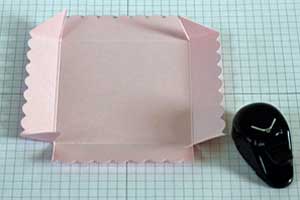
Step 4
Hold cardstock horizontally with the 2" section at the top.
Use scissors to cut off all but one 2" tall section from the top of the cardstock as shown. This will be the flap closure for the box.
Cut the narrow piece at an angle to create tab for adhesive.
Make vertical cuts at the bottom to create 1 1/2" tall flaps, and cut off the narrow piece. This will be the bottom of the box.
-
Step 5
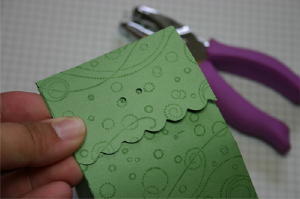
Remove guide from corner rounder and punch along 2" flap to create a scalloped edge on box flap, making sure to line punch up so that scallops connect. Or, use scalloped scissors for a faster decorative edge.
-
Step 6
Use a bone folder or other straight edge to sharply crease all scored lines to shape box.
Apply Sticky Strip™ close to side tab's score line.
Remove red liner, and carefully construct box.
-
Step 7
Fold small flaps toward center of box, and large flaps over small flaps.
Apply Sticky Strip to outside edge of large flap under what will be the box front.
Remove red liner, and apply pressure to finish bottom of box.
-
Step 8
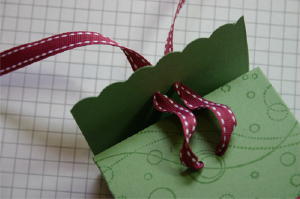
Line up front of box with back of box at top and pinch together. Release.

-
Punch two holes in flap with 1/8" handheld punch.
-
Step 9
Pull flap down to close box, and use a pen to mark where holes were punched.
Use 1/8" handheld punch to punch holes at markings.
-
Step 10
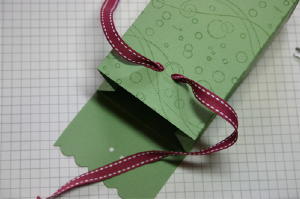
Thread ribbon through holes on box. Center ribbon.
Use 1/8" handheld punch to punch holes at markings.
-
Step 11
To close box, thread ribbon through holes punched through flap.
Pull to tighten, and tie bow.
-
Step 12
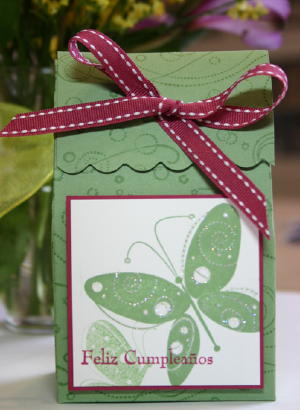
Stamp scrap cardstock (here, the largest layer is 2 3/4" square), embellish, and adhere to box front with Stampin' Dimensionals.
Enjoy filling and giving!
Create this beautiful box to hold your 3" x 3" notecards.
Supplies
- Scor-Pal™ (or paper cutter with scoring blade)
- One 7 1/2" square piece of cardstock (for base of box)
- One 5 5/8" square piece of cardstock (for box top)
- One 5 1/8" square piece of patterned paper A
- One 1 3/4" x 12" strip of patterned paper B
- One 1 3/4" x 3 1/2" strip of patterned paper B
- Corner Rounder punch
- Bone Folder
- Sticky Strip™
- Scissors
- Stamps, Ink, Ribbon (or other embellishments) to decorate box
Step-by-Step
-
Step 1
Score 7 1/2" square cardstock at 2" on all four sides.
-
Step 2
Score 5 5/8" square cardstock at 1" on all four sides
-
Step 3
Score 5 1/8" piece of patterned paper at 3/4" on all four sides

-
Step 4
Prefold all scores with Bone Folder.
-
Step 5
Using scissors, make vertical cuts (following the scored line) on all four sides to create a flap in each corner of the 7 1/2" square cardstock piece.
Repeat this step on the 5 5/8" square piece of cardstock and the 5 1/8" piece of patterned paper

-
Step 6
Add Sticky Strip™ to each corner flap on the 7 1/2" square cardstock and fold into a box.
-
Step 7
Adhere 1 3/4" x 12" strip of patterned paper around box so that both ends start and end on same side.
Adhere 1 3/4" x 3 1/2" strip of patterned paper to the side with the gap.
-
Step 8
Using scissors, cut each flap of the 5 5/8" cardstock in half at an angle.
Create a scalloped edge around the 5 5/8" piece of cardstock using the Corner Rounder punch. Click here to find a tutorial on scalloping edges with the corner rounder punch.
-
Step 9
Add Sticky Strip™ to each corner flap of the 5 1/2" cardstock and fold to create box lid.
Adhere the 5 1/8" square piece of patterned paper to the box lid.

-
Step 10
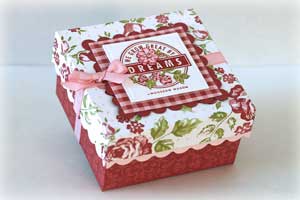
Stamp and embellish your box as desired.
-
Your finished box is perfect to hold a set of coordinating 3 x 3 Mini Note Cards and envelopes!
Video!
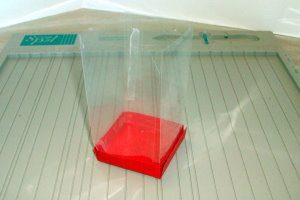
Create a see through box with acetate and cardstock.
Supplies

- Two 3" x 3" pieces of cardstock
- One 8 1/4" x 3 1/2" piece of acetate
- Two 8 1/4" x 1/2" strips of patterned paper
- Sticky Strip™ or other strong adhesive
- Scor-Pal™ or other scoring tool
- Ribbon
- Hole Punch
- Scissors
- Stamps
- Ink
- Marker
- Candy
Step-by-Step
-
Step 1
Score the 3" x 3" squares of cardstock at 1/2" on all four sides.
-
Step 2
Cut score lines to the point where they connect to the score lines from the other side.
You will be cutting four score lines, two on one side and two on the opposite side.
-
Step 3
Pre-fold all score lines. Add Sticky Strip™ to the outside corners of the scored tabs.
-
The completed box top and bottom.
-
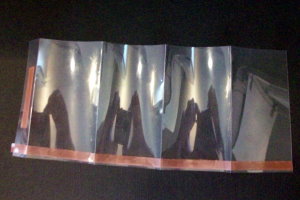
Step 4
Score the acetate on the long side every 1 15/16" (slightly under 2").
Prefold score lines.
Apply Sticky Strip™ to the bottom edge of the acetate and to the small tab on the side.
-
Step 5
Remove tape liner from the tab and adhere to form an open ended box.
Remove tape liner from bottom edge.

-
Step 6
Insert the end of the box with the adhesive into one of the cardstock bases.
-
Step 7
Adhere the patterned paper strips to the top and bottom cardstock pieces.

-
Step 8
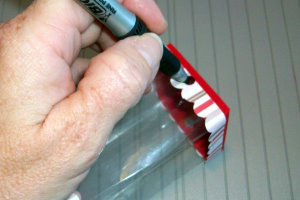
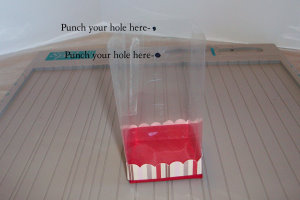
Center and punch two holes on opposite sides of the lid.
-
Step 9
Place the lid over the box and use a marker to indicate where the holes should be punched.
-
Step 10
Remove the lid and punch the holes in the acetate at markings.
-
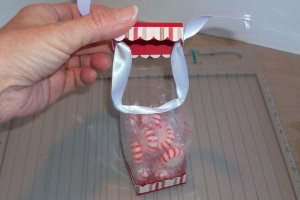
Step 11
Thread a ribbon through the lid and acetate and tie, making sure the ribbon is long enough to lift the lid to fill the box.
Hint:
Don't tape the lid to the box! This way, the candy can be taken out without destroying the box.
-
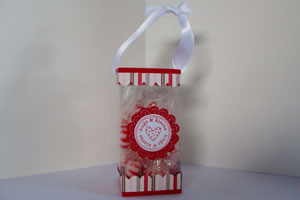
Step 12
Decorate the box.
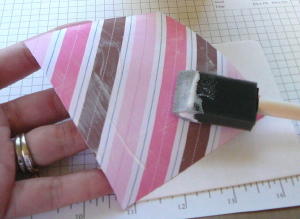
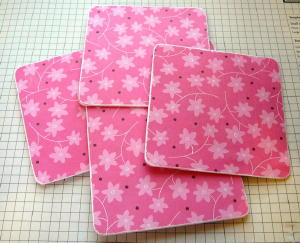
Attach a few coasters with ribbon and adhesive to create a fun open-topped box.
Supplies

- Mod Podge® [ buy it ]
- Foam brush
- Five 4” x 4” medium-weight chipboard coasters Need some of these? StartLitStudio (Cindy Lyles) stocks chipboard coasters in her online store.
- Five 4” x 4” pieces of patterned paper
- Sanding Block
- Ribbon
- Piercing template
- Hole punch
- Scissors
- E-6000® [ buy it ] or other strong glue
Step-by-Step
-
Step 1
Adhere one 4â€�x4â€� patterned paper square to each of the five coasters by applying Mod Podge™with a foam brush. Let dry.
-
Step 2 (Optional)
Sand and trim rounded edges. Coat the outside with Mod Podge™ for a finished look.
-
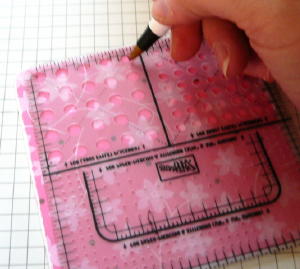
Step 3
Place the piercing template on the edge of one of the coasters. Trace approximately every other large hole onto the coaster.
You will have 5 traced holes lining the side.
-
-
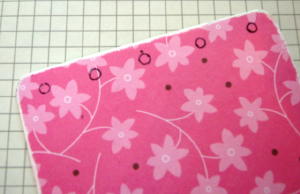
Step 4
Punch the holes with a hole punch. A Crop-o-Dile® was used here.
-
-
Step 5
Once one side of the coaster is punched, set it directly on top of each of the other coasters and use it as a punching guide. Punch two opposite sides of 4 coasters.
The fifth coaster will be used as the bottom of the box and should not be punched.
-
Step 6
Use ribbon to tie the four sides of the box together. You can lace the ribbon or tie it across the coasters.
-
-
Step 7
Apply strong glue to the edges of the last coaster. Adhere to the bottom of the coaster box.
-
Step 8
Finish project.
Supplies
- One 3" by 11” piece of cardstock
- Scrap piece of cardstock
- Scor-Pal™ or similar scoring tool
- Scor-Tape™ or other double sided sticky tape
- Scissors
- Pencil
Step-by-Step
-
Step 1
Start with a 3" by 11” piece of cardstock.
Score at 3”, 6”, 9”
-
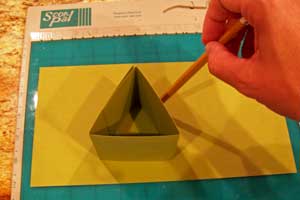
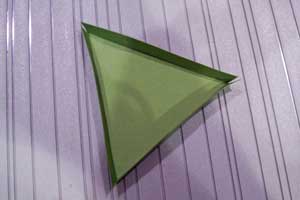
Step 2
Fold cardstock so that it forms a triangle shape. Do not adhere.
Trace around the perimeter of the shape with a pencil on the same colored piece of cardstock.
-
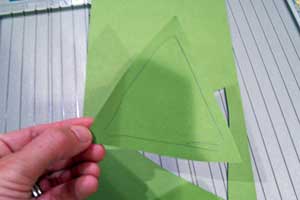
Step 3
Cut out triangle shape leaving about ¼ inch border around the pencil lines.
The pencil lines do not have to look good!
-
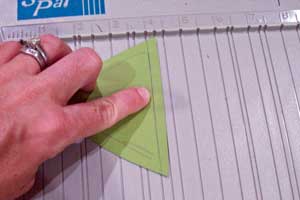
Step 4
Line the top and bottom of each line up on your Scor-Pal™ and score the line.
The scored line will not always follow the pencil line exactly, a close approximate is fine.
-
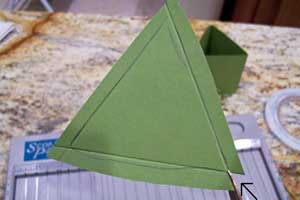
Step 5
Cut out the triangle areas where the score lines crossed (as shown in the picture).
Do this for every corner.
-
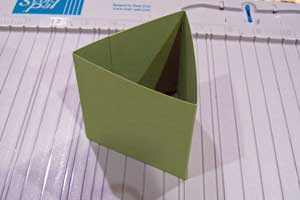
Step 6
Fold up the sides of the triangle bottom.
Apply Scor-Tape™ along each outer edge of the triangle.
-
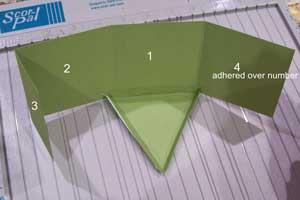
Step 7
One by one, take off the strip of sticky tape backing and adhere the bottom to the each side.
Follow the numbers to adhere them in the easiest order.
-
Step 8
On the final edge adhere the small flap to the bottom of the triangle bottom and then adhere the final large side over the smaller side.
This will make sense as you do it.
-
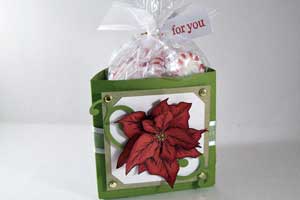
Step 9
Decorate as you wish. I find it easiest to create layers and then adhere them to the triangle box with foam mounting tape.
Supplies
- One 8 1/2" x 11" piece of Cardstock
- Paper Cutter with scoring tool
- Sticky Strip™ or other strong adhesive
- Scissors
- Stamps
- Ink
- Punches
- Corner Rounder
- Crop-a-Dile™
- Embellishments
Step-by-Step
-
Step 1
Score 11” side of cardstock at 1/2", 3 1/2", 5 3/4", and 8 3/4".
-
Step 2
Score the 8 1/2” side at 3" and 6 1/2".
-
Step 3
Fold the bottom of the card stock (the portion with the short scored sections) under and stamp across the exposed area of card stock.
-
Step 4
Cut each score line up to the intersecting score line to create flaps as shown.
-
Step 5
On one edge of the card stock, you’ll have 1/2” flaps.
Cut off the two 1/2" flaps on the ends, leaving the center flap.
-
Step 6
Place Sticky Strip™ on the 1/2" flap.
Be sure to place the adhesive strip on the front (stamped) side. Leave the liner on the adhesive.
-
Step 7
Place Sticky Strip™ on the other flaps as shown to createl interior sections of the box.
Leave the liner on the adhesive.
-
Step 8
Center punch over panel and push the cardstock all the way into the Wide Oval punch to create handles for the box.
-
Step 9
Use the corner rounder on the corners of the handles.
-
Step 10
Peel the liner from the 1/2" flap on the side of the box (mid section).
Fold the box into shape so that the ends meet the adhesive. If necessary, fold the flaps out of your way.
-
Step 11
Peel the liner from the side flaps and adhere them to the interior sides of the box for added stability.
-
Step 12
Remove the liner from the bottom flaps.
Fold in the two smaller flaps and then adhere one of the longer flaps to the smaller flaps.
I fold in the flap that’s on the side where the seam is so the front of the box will be seamless.
Fold the remaining flap into place.
-
Step 13
Decorate the front of the box. Use the Crop-a-Dile™ to punch holes for the ribbon closure.
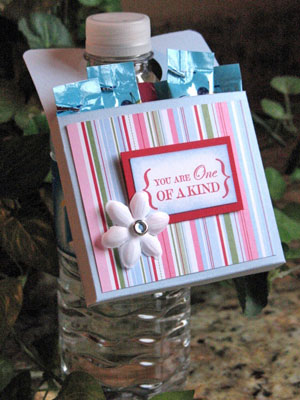
Supplies
- 5 1/2" x 11" piece of cardstock
- Paper cutter with scoring blade
- Corner rounder
- 1 3/8" Circle Punch
- Sticky Strip™
- Additional cardstock
- Stamps
- Ink
- Embellishments
Step-by-Step
-
Step 1
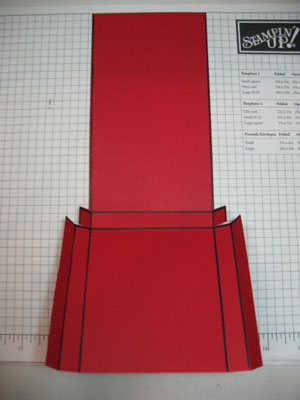
Turn 5 1/2" x 11" piece of cardstock sideways and score at 4" and 4 1/2".
-
Step 2
Turn the cardstock lengthwise and score at 1/2", 1", 4 1/2", and 5".
-
Here, the score lines were traced with a marker for visibility. No need to do this at home!
-
Step 3
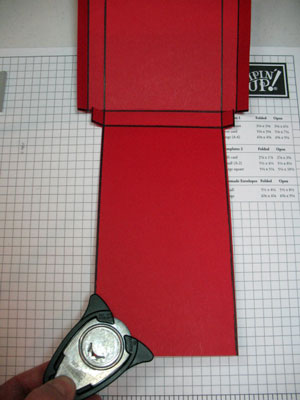
Cut away sections of cardstock as shown in the photo.
-
Step 4
Cut a slit on both sides as shown so the squares become small tabs.
-
Step 5
Prefold all score lines. It should look like this.
-
Step 6
Round the corners of the long back panel.
-
Step 7
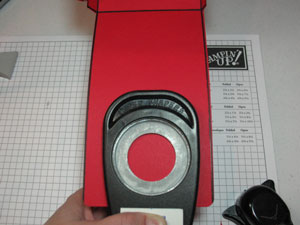
Punch a circle so the pouch can be slipped over a bottle. Here a 1 3/8" circle punch was used.
-
Step 8
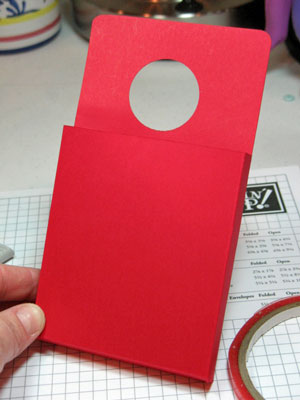
Fold to create box and attach tabs to back with Sticky Strip™ or other strong adhesive.
-
Step 9
Decorate with stamps, cardstock, paper and embellishments of your choice!
-
Step 10
Hang on a bottle and give it away!
Variations
-
Cut the front and back panels shorter. Fill with "drinks on the go" packets and hang on a water bottle.
Make the hole larger and hang over a door knob to surprise a neighbor. Perfect for those Halloween "boo" treats!
Fill with cocoa, gum, a candy bar, or other treats!
Supplies

- 7" x 11" piece of cardstock
- Sticky Strip™ or other strong adhesive
- Paper cutter with scoring blade
- Stylus tool
- Ruler
- Bone Folder optional
- Scissors
- Stamps
- Ink
- Additional cardstock and embellishments to decorate your carton
Step-by-Step
-
Step 1
Score at 2", 5" and 6 1/2" on the short side of the cardstock.
-
Step 2
Turn cardstock 90 degrees and score at 2 1/2", 5", 7 1/2" and 10" on the long side of the cardstock.
-
Step 3
Arrange cardstock with the long side at the bottom of the work surface.
Now cut on vertical scores lines ( 2 1/2", 5", 7 1/2" and 10") up to the first horizontal score lines.
This will make the bottom of the box.
-
Step 4
Cut part of the 1" scored strip on the left hand side, leaving only the 3" piece to create a glue tab for the sides of the box.
On the top of the box, cut the third panel of the 1/2" x 2 1/2" rectangles off as pictured. This will be the milk carton spout.

-
Step 5
On the remaining three 1/2" x 2 1/2" panels, use a stylus and ruler to add a score down the middle of each panel.
-
Step 6
Use ruler and stylus to add diagonal score lines to the box as shown.
The lines have been traced with a marker on the back side of the cardstock here.
-
Step 7 (Optional)
Stamp cardstock.
-
Step 8
Use bone folder to pre-fold all score lines, including the diagonal ones.
-
Step 9
Add Sticky Strip™ to your glue tab.
-
Step 9
Add Sticky Strip™ to the glue tab.
-
Step 10
Adhere the glue tab inside to the other wall to form the box.
-
Step 11
Fold the bottom flaps in one at a time and add Sticky Strip™ to the last two flaps to close the box.
-
Step 12
Add Sticky Strip™ to the back half of the 1/2" panels at the top to hold the milk carton closed.
Now finish the box by adding embellishments.
Supplies
- One 6" x 11" piece of cardstock
- Scor-Pal™ or other scoring tool
- Scissors
- Adhesive
- Additional cardstock andembellishments to decorate your box
Step-by-Step
-
Step 1
With short side of 6" x 11" cardstock at the top of the scoring tool, score at 1" and 5".
-
Step 2
Turn cardstock, and on the 11" side of your cardstock, score at 1", 5”, 6” and 10”.
-
Step 3
Following the scored lines along the 11” side, use scissors to cut flaps.
Begin cut on outer edge of paper and stop at the perpendicular scored line as shown.
-
Step 4
Adhere flaps to inside of box.
-
Step 5
Decorate and fill box as desired.
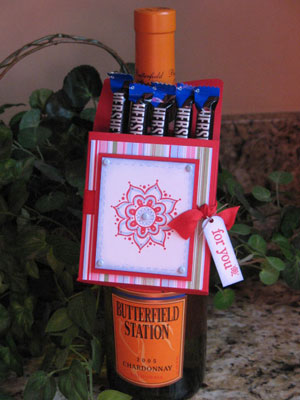
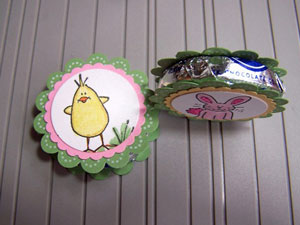
Supplies

- 5 ¼” x 3 ¾” piece of cardstock (or heavy patterned paper) for box
- 5 1/8” x 3 1/16” piece of cardstock (or heavy patterned paper) for sliding cover
- Paper cutter with scoring blade
- Scissors
- Sticky Strip™ or other adhesive
- 3 Hershey's® Nuggets® chocolate bars
- 3 1” x 3 ¼” pieces of cardstock or patterned paper or Avery® 5160 address labels
- Embellishments
Step-by-Step
-
Step 1
On the 5 1/4” x 3 3/4” piece of cardstock, score all 4 sides at 1/2” and 1 1/8”. It is easiest to measure the 1/2” mark on the left side of the cutting/scoring blade track. Then turn the paper around to measure the 1 1/8” mark on the right side of the cutting/scoring blade track.
-
Step 2
Use scissors to remove the 3 small boxes that make an "L" shape at EACH corner. On the long (5 1/4") sides, cut along the score line to the 1 1/8" mark creating little flaps as shown.
The box goes together easily if the flaps are trimmed on an angle as shown.
-
Step 3
Fold each short side and then the long sides of the box, securing with Sticky Strip.
Use a bone folder or other straight edge to give the creases a sharp, crisp fold.
-
Step 4
This becomes the box.
-
Step 5
Moving on to the 5 1/8" x 3 1/16" piece of cardstock, with the 5 1/8" side at the base of the trimmer, score the 3 1/16" length at the 11/16", 2 1/4", 2 15/16" and 4 7/16" marks.
-
Step 6
Fold on the score lines, wrap around the box to check for correct fit and secure the overlapping edges with Sticky Strip. This is the sleeve.
-
Step 7
You may use strips of cardstock or patterned paper cut into 1" x 3 1/4" strips. Because the cardstock is a heavier weight, use glue dots to secure the two ends of the strip at the bottom of the nugget. This creates a mini sleeve for each nugget.

-
Step 8
Nuggets may be covered with stamped 1" x 2 5/8" (Avery® 5160) address labels.
-
Step 9
Finished project.
Supplies
- One piece 4” x 9 1/2” Cardstock or patterned paper
- Scor-Pal™ (or other scoring tool)
- Scor-Tape™ (or other strong adhesive)
- 1 3/8” Circle Punch
- Cutting Mat
- Hobby Blade
- Ruler
- Scissors
- Medium Window Sheet
Step-by-Step
-
Step 1
Line the piece of 4” x 9 1/2” cardstock or paper with the short side along the top of the Scor-Pal, then score at 1” and at 3”.
-
Step 2
Turn the cardstock so that the 9 1/2” length is at the top of the Scor-Pal.
Score at 1”, 3”, 4” and 6”.
-
Step 3
Keeping the 9 1/2” length along the top of the Scor-Pal, shift the cardstock to the 15/16” mark (between the 7/8” and 1” mark) and score at 8” and 10”.
Note:
If you are not using a Scor-Pal, score cardstock at 7 1/16” and 9 1/16”.
-
Step 4
Keeping your cardstock oriented as it was in step three, cut away the pieces along the score lines as shown.
Scored lines were traced with a black marker for this tutorial. The solid lines indicate additional places to cut. The tab on the far right side is ¾” long.
Note:
Use a ruler and measure, then draw the tab with a pencil to make sure it is centered.
-
Step 5
Angle cut each of the four tabs. The blue arrow is pointing to one of the four tabs.
-
Step 6
Cut a centered, 1” slot with a hobby blade on the second score line from the left.
Note:
The black line indicates where the slot should be cut. Use only one stroke of the hobby blade; the slot needs to be narrow.
-
Step 7
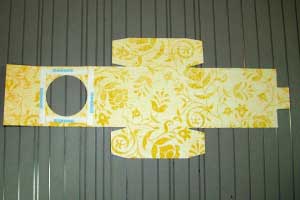
Punch a 1 3/8” centered circle in the second segment from the left.
Hint:
Draw an ‘X’ from corner to corner with a pencil to help get the circle centered (the blue dotted lines represents the pencil marks).

-
Step 8
Flip the cardstock over to the back side. Apply adhesive around the circular hole as shown.
Remove the adhesive liner and place a piece of window sheet (slightly smaller than 2” x 2”) over the circular hole.
-
Step 9
Flip the cardstock over to the front side.
Apply adhesive on the four tabs as shown.
-
Step 10
Flip the cardstock over to the back side and bend the cardstock inwards along score lines.
-
Step 11
Remove the adhesive liner from the four tabs and assemble the bottom of the box.
Tuck in the circular window piece.
Close the lid of the box by slipping the tab into the slot.
-
Step 12
Embellish your box as desired and fill with a little gift or a sweet treat .

Your Turn
You've seen the tutorial, now you try it! We've got a section of the gallery set aside for Peek-a-boo Box. Try this technique, then upload your artwork to the gallery. Show us your creations!Supplies
- 4 1/4" x 5 1/2" piece of lightweight cardstock or patterned paper
- Sticky Strip™
- Paper Crimper
- Embellishments
- Candy
Step-by-Step
-
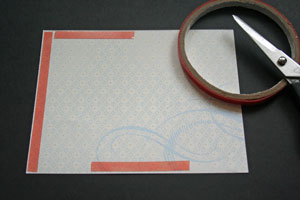
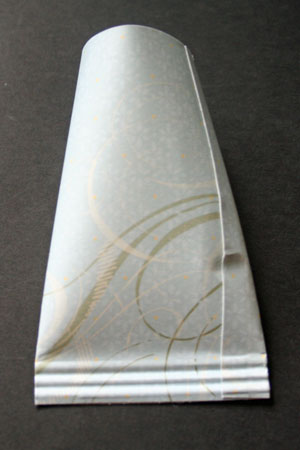
Step 1
Apply Sticky Strip™ to one of the short sides of the reverse side of the 4 1/4" x 5 1/2" piece of patterned paper.
Apply another strip from the end of the long side until half way in.
Apply the last piece in the middle of the other short side of the paper.
-
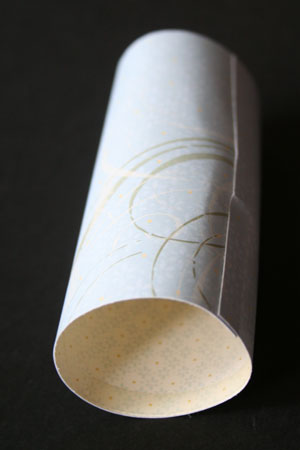
Step 2
Remove the plastic liner from the Sticky Strip™, but make sure to leave the backing on the Sticky Strip™ that is in the middle of one of the long sides.
Adhere the short ends of the paper together to form a cylinder.
-
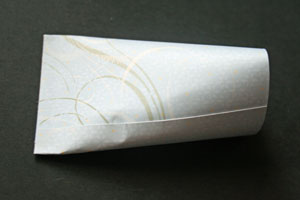
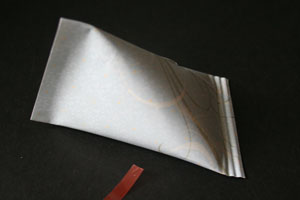
Step 3
Press the two sides with the Sticky Strip™ exposed together.
-
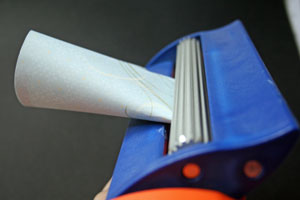
Step 4
To reinforce the adhesive, slide the taped end into your paper crimper and slowly add two or three crimped lines.
-
-
Step 5
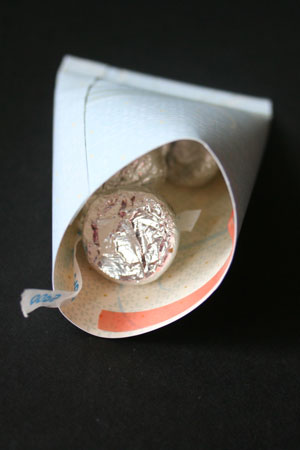
Fill container with candy or other small treat.
-
Step 6
Remove the liner from the remaining Sticky Strip™, then push the sides together in the opposite direction from the other end.
When looking at the container from the top, the two ends will form a +.
-
Step 7
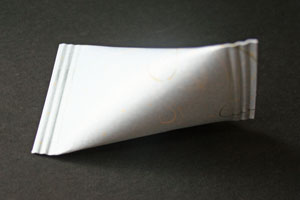
Crimp this edge of the container.
-
Step 8
Decorate the container.
Variations
-
Crystal Clear
Use Vellum or acetate to make a see through container. When using acetate, reinforce the short ends with brads or eyelets.
(After 1 1/2 weeks my Sticky Strip™ taped box that is shown here opened up).
Resize it
-Try making the container in a different size. If you need a bigger version, try out a 5 1/2" x 8 1/2" sheet of paper.
-Is it not quite small enough? Use a 4 1/4" x 2 3/4" piece of paper to make a tiny treat holder.
-Make it longer! Try taping the long side together first to make your container long and skinny.

Your Turn
You've seen the tutorial, now you try it! We've got a section of the gallery set aside for Sour Cream Container. Try this technique, then upload your artwork to the gallery. Show us your creations!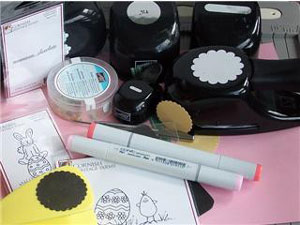
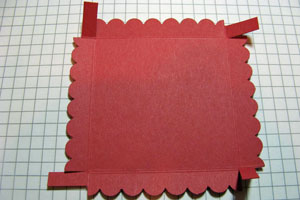
- 5"x 5" piece of cardstock
- Additional cardstock for punches
- Four 2" x 1 1/2" pieces patterned paper
- Scor-Pal™, or other scoring tool
- Slot Punch
- Round Scallop Punch
- Circle Punch
- Brads
- Ribbon for handle
- Adhesive
- Peppermint Patties either Pearson or York
Step-by-Step
-
Step 1
Score each side of 5" cardstock square at 1 1/2".
-
Step 2
Adhere strips of patterned paper to each of the outer center panels.
-
Step 3
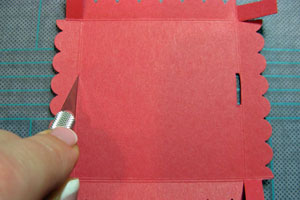
Cut the two score lines on top and bottom of the square.
Punch a slot in the two center pieces that have the cut score lines next to them.
-
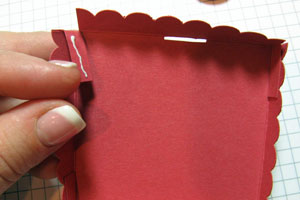
Step 4
Fold one flap in and punch through existing hole to add a slot in the sides of the basket.
Repeat with each flap.
Hint:
Don't try folding the box sides up and punching through all three layers at once. The slot punch can only punch through one layer at a time.
-
Step 5
Apply adhesive on the outer sides of the flaps and fold them in one at a time to create the basket.
-
Step 6
Loop ribbon through the slots and secure with a brad to make a handle.
Variation:
Instead of using the slot punch and ribbon, try a strip of cardstock attached with eyelets or brads.
-
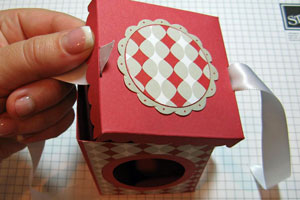
Step 7
Apply strong adhesive to a scallop punched cardstock circle.

-
Step 8
Adhere scallop to peppermint patty.
Decorate a second scalloped circle and adhere to the other side of candy.
-
Step 9
Decorate the basket and fill with embellished patties.
When made using these dimensions, the basket will hold four patties.
Your Turn
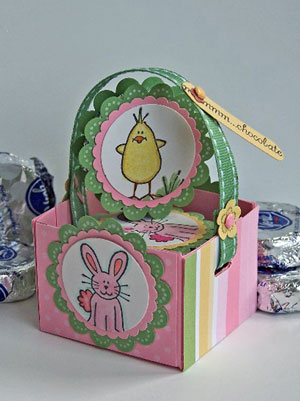
You've seen the tutorial, now you try it! We've got a section of the gallery set aside for Tiny Treat Basket. Try this technique, then upload your artwork to the gallery. Show us your creations!Supplies
- Paper Cutter with scoring tool
- Scissors
- One 6 5/8" x 11" piece of cardstock
- One 4 1/4" cardstock square
- Four pieces of patterned paper measuring 2 1/2" x 3 7/8"
- 20 inches of ribbon
- Oval Coluzzle, or other oval cutting tool
- Self healing mat
- Craft knife
- Glue
- Sticky Strip™
- Scallop Edge Punch
- Scrap cardstock for decorating
Step-by-Step
-
Step 1
Line up your 6 5/8" x 11" piece of cardstock vertical with your paper cutter and score at 2 5/8".
-
Step 2
Turn your cardstock and score at 2 5/8", 5 1/4", 7 7/8" and 10 1/2".
-
Step 3
Fold all the score lines, and then cut on them to make flaps along the bottom. Cut off the smallest end piece.
-
Step 4
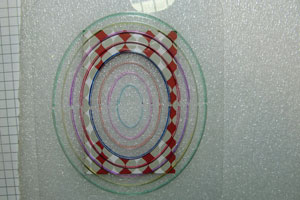
Center your Coluzzle™ between the score lines and the top of the box (I marked my score lines with a black marker) on one of the box side panels and cut out an oval.

-
Step 5
Centering your Coluzzle™ over one of your your patterned paper pieces, cut out a slightly bigger oval from the center. You want the hole to be bigger for matting purposes.
-
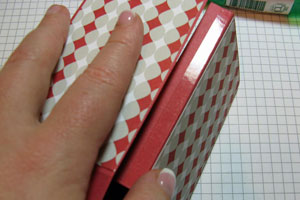
Step 6
Adhere your patterned paper pieces to the box front and add some Sticky Strip™ to the flap on the end.
Optional:
Adhere a piece of Acetate on the inside box to cover the window to keep loose treats from falling out.

-
Step 7
Remove the red liner and adhere the box together.
-
Step 8
With the box upside down and the oval facing toward you, fold in the 2 side flaps.
-
Step 9
Add Sticky Strip™ to the flap in the back of the box (no oval), remove the liner and fold down the front flap to finish the box.
-
Step 10
Score your 4 1/4" square piece of cardstock at 3 1/2" on all sides.
-
Step 11
Cut on the right score line on each side, creating flaps.
-
Step 12
Punch the edges off your square with the scallop edge punch, but cut the scalloped area off the flaps. You do not want them to show under the other scallops.
-
Step 13
Using your craft knife, create slots in the top of the lid. You could also use a punch if you have one that works. Decorate as desired using scrap cardstock and patterned paper.
-
Step 14
Add glue on the flaps to adhere the lid together.
-
Step 15
Thread the ribbon through one slot, then go under and around the box, threading it through the other slot. Tie shut to hold the lid on.
-
Step 16
Decorate your box.
wo! son increíbles las cajitas ya he visto algunas cositas de tu blog...estan muy chulas...vendré a visitarlo a menudo
ResponderEliminarUn saludo
These things are amazing, you are very talented. Thank you so much for sharing them.
ResponderEliminar